Published April 22, 2024
More people are turning to Zoom for their virtual communication needs. Here’s how to tweak those settings to maximize the quality of your next video conference meeting.
Many businesses have relied on video teleconferencing for years, especially those who communicate with long-distance clients and colleagues. Also, anyone who’s managing remote teams or has a remote work policy in place most likely has experience with video conferencing.
With the arrival of the pandemic, almost all businesses have turned to this form of online communication. If you feel like you’ve been stumbling along on video calls, completely confused and overwhelmed by all the settings and options, don’t worry -- we’re here to help.
There’s a big difference between knowing how to video conference and tweaking the settings to make it an optimal experience. Why not aim for perfection?
Make sure to spend some time deciding which type of video conferencing is right for your business before moving forward. For example, you might decide on a hard codec system, which is pricey but requires no internet access.
We’re going to focus primarily on Zoom, which is a popular, easy-to-use, cloud-based video conferencing software. Keep in mind that some, but not all, of these practices can be applied to other cloud-based video conferencing programs, such as Skype.
6 best practices for video conferencing your small business needs:
- Navigating display options
- Enhancing personal appearance
- Maximizing sound quality
- Using screen share options
- Understanding breakout rooms
- Improving WiFi connectivity
1. Navigating display options
Many people resort to using Zoom’s default features either because they’re too scared to mess with the settings or they simply don’t have time to experiment. And, honestly, using the default settings is enough to get the job done.
However, if you want to enhance your online conference calls, it’s important to tweak a few settings first.
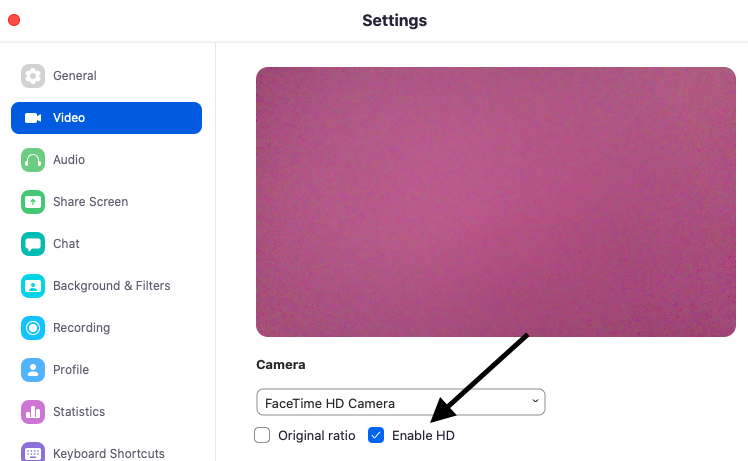
You can enhance your video quality by selecting Enable HD, which is found under Video Settings. Image source: Author
Start by making these changes under the Video Settings tab:
- Enable HD: This improves your overall video quality. However, don’t select it if you have a weak WiFi connection.
- Virtual backgrounds: You have the ability to include a range of cool backgrounds, such as the Golden Gate bridge, outer space, or your own uploaded image. However, we don’t recommend regularly using this option because it can be distracting. The only exception is if you can’t find a clean or uncluttered spot in your house for your video call, in which case it’s OK to use a subtle virtual background such as an office setting.
- Display name: It’s important to make sure that everyone’s name is displayed, especially for large group conferences. Under Video Settings, check the box that says “always display participant name on their videos.” Encourage all participants to select this option as well, making the video call more personal and inviting.
2. Enhancing personal appearance
You always want to present your best image when participating in a business video conference. Sometimes the video angle can make you look tired, bored, or out of focus. Let’s face it, nobody wants to do business with a zombie!
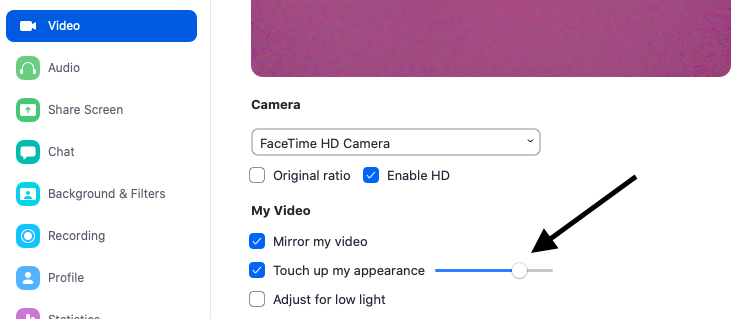
Select the “touch up my appearance” button to brighten your image, using the slider to maximize the effect. Image source: Author
Here are a few steps to improve your appearance in the virtual world:
- Raise the computer to eye level: Use books, a laptop stand, or even a cardboard box to lift your computer to eye level. If it’s lower, you risk everyone staring up your nose. Also, make an effort to look directly into the camera while talking.
- Use the “touch up my appearance” setting: One reason we love Zoom is because of this particular feature. It may seem minor, but it does make a difference by helping to brighten your face and even minimize dark circles under the eyes. You’ll find it under Video Settings. There’s a sliding bar to maximize the effects. Again, it will help you look more alert, focused, and ready for business.
- Focus on lighting: If you’re having a group video conference during the day, make sure to position yourself in front of natural light, such as sitting three to four feet away from an open window. If the call is at night, or you don’t have a natural light source, set up a lamp behind your computer and directly aimed at you. Most importantly, don’t sit with a light source behind you as this will create unnecessary glare and shadows.
- Minimize background clutter: Many people are unexpectedly working from home, and with that comes the challenge of finding a suitable place to do video calls. Try your best to create a spot that has minimal background clutter. You want the video participants to focus on you and what you’re saying, not on the towering stack of dirty dishes behind you. Check out our 7 work-from-home hacks to improve your home office.
3. Maximizing sound quality
Sound problems are one of the biggest complaints when it comes to video conferencing. These issues range from multiple participants talking at once, background noise such as screaming kids or barking dogs, or your neighbor mowing the lawn just as you’re hopping on a video call.
But with a few simple steps, you can drastically improve your video call’s sound quality.
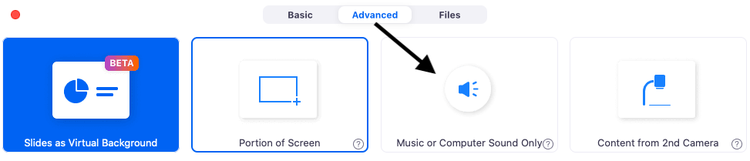
Under the advanced screen share options, you can select music or computer sound only. Image source: Author
Here are some essential tips for improving your next Zoom call:
- Share music: If you’re teaching a dance or fitness class, music quality is your top priority. Under Share Screen, you’ll see an Advanced button at the top. Click on that and then select “music or computer sound only” (see above image). This will share the music directly from your playlist, ensuring all participants hear the highest quality possible. Keep in mind that it will drown out your voice, so make sure to pair it with a high-quality microphone or headset.
- Use mute options: Encourage all participants to select “mute my mic when joining a meeting,” which is found under the Audio Settings. This will help keep the sound more manageable, especially when participants join late. Also, the host and any co-hosts can click on Participants, then select Mute All. There’s also the option to allow people to unmute themselves when they need to speak.
- Wear headphones: Wearing headphones is always recommended, especially if they come equipped with a built-in microphone. Ultimately this helps make sure everyone’s sound quality is loud and clear while helping to filter out background noise.
- Minimize background noise: As we embrace a more remote working environment, many people are left dealing with excessive background noise such as a spouse on a work call, an attention-hungry child, or a ringing doorbell. See the image below on how to change the “suppress background noise” from auto to high.
- Encourage use of the Raise Hand feature: Sometimes it’s hard to keep conversations under control, especially for large groups. Encourage all team members to utilize the Raise Hand feature for all future meetings. It can be found by clicking on Participants, which is found in the meeting controls at the bottom of the screen. You can also press the “Alt + Y” keys (or “Option + Y” for Mac) to automatically enable this feature.
- Ask questions in chat: Another option for large group meetings is to ask participants to post their questions in the chat box. In turn, this helps avoid multiple people talking at once. The chat button is found at the bottom of the screen. You have the option to message the group or individual participants.
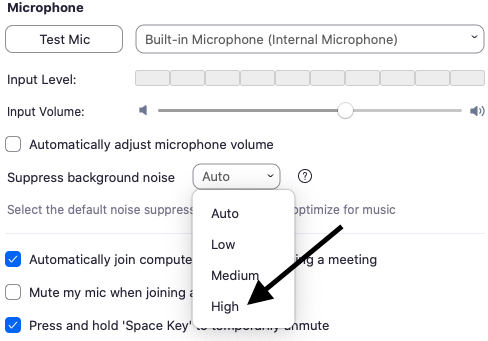
If you have an exceptionally high level of background noise, select the highest “suppress background noise,” which is found under Audio Settings. Image source: Author
4. Using screen share options
Sharing the contents of your screen is super easy with Zoom. If you’re wanting to explore other video conferencing options, here’s a breakdown of what the popular screen sharing software can and cannot do.
When on a Zoom call, you can locate the Share Screen green button at the bottom of the screen. You will then be presented with a range of options, including all the documents currently open on your computer, a page or video on the internet, or a whiteboard to draw and write on.
If you’re interested in sharing music, see the above section on improving sound quality. If you want to share only a portion of the screen or content from a second camera, make sure to select the Advanced button at the top.
Otherwise, select the document or webpage you need to share, and you’re good to go.
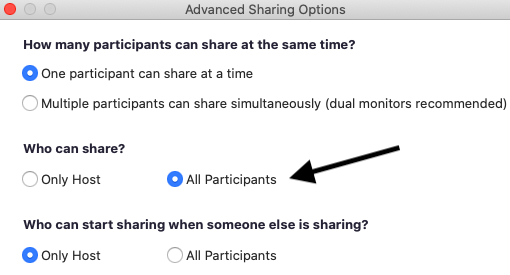
Select All Participants if you want everyone to be able to share during the conference call. Image source: Author
If you’re wanting other participants to be able to screen share during the Zoom meeting, follow these steps:
- Click on the little green arrow to the right of the Screen Share button.
- Select “advanced sharing options.”
- From here, you can select “one participant can share at a time,” as well as allowing all participants the ability to share. See image above.
Another feature of Zoom’s screen share is the “side-by-side mode.” You can select this under the Share Screen Settings. When activated, you’ll see a grey vertical bar between the shared document and the participant’s videos.
You can slide this bar left or right to make either the document or the participants’ videos bigger -- or the same size. Make sure to select Gallery View in order to see all participants or Speaker View if you only want to see the active speaker.
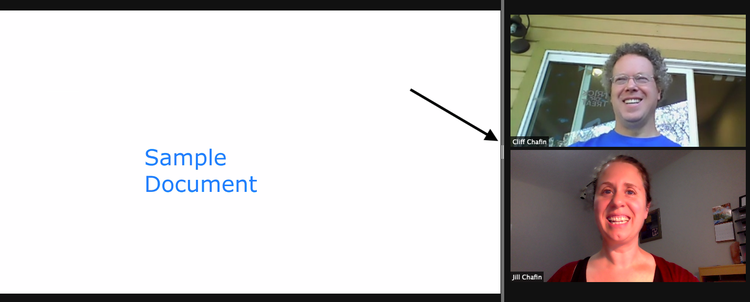
Enable “side-by-side” mode and use the grey vertical bar to adjust the size of the document and participants. Image source: Author
The benefit of using this mode is that you’re able to view the entire shared document without part of it hidden beneath the participants’ videos. Above is an example of how the “side-by-side mode” looks when viewing a shared document.
5. Understanding breakout rooms
Online video calling used to be super basic, with everyone on the same screen fighting or hiding from center stage.
Now Zoom has the ability to divide your group into smaller groups with the breakout room feature. This is an excellent way to create a smaller, more intimate environment for larger conferences.
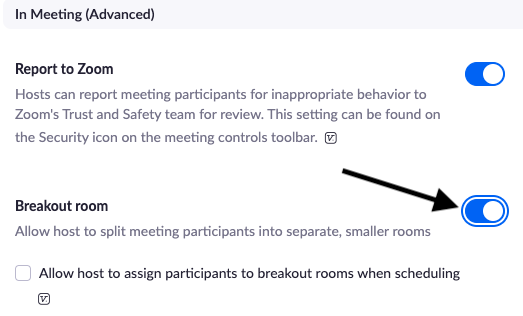
Be sure to enable breakout rooms before your conference call begins. Image source: Author
Here are the steps to enable breakout rooms before your next Zoom call:
- Sign into your Zoom account via the web portal. Make sure you have editing privileges for the account.
- Click on Account Settings.
- Go to the Meeting tab.
- Scroll down to In Meeting (Advanced)
- From here you can slide the ball to the right to enable breakout rooms. You can also check the box to pre-assign participants to the breakout rooms before the meeting begins.
The breakout rooms allow you to split your conference meeting into 50 separate sessions. You can message each group while they’re in their individual rooms and also manually or automatically bring people back into the main session.
6. Improving WiFi connectivity
Even with faster WiFi connections, you’re bound to run into technical issues during important Zoom sessions. And nothing’s worse than sounding or looking like a robot during a crucial video call.
Here are a few tips to maximize your WiFi connection:
- Move closer to your router: If you’re working with a portal laptop, consider moving closer to your WiFi router during important conference calls.
- Close other applications: We often forget we have a zillion things open at one time. All those applications are working even if you’re not actively using them, so take a moment to close everything down before your meeting begins.
- Disable HD webcam: Yes, we told you to use the HD feature to enhance your video quality. However, if you’re having connectivity issues, then uncheck this option. It can be found under Video Settings.
- Mute when not speaking: Everything on Zoom takes WiFi juice to work properly. So when not speaking, keep that mute button on.
- Stop video if you can: We encourage people to use their video feature whenever possible as it helps to feel more connected with the group in general. However, if you’re struggling with connectivity, stop the video.
- Limit other WiFi use: If you know you have an important meeting coming up, make sure everyone else in your household refrains from internet use during that time. That means no binging on Netflix or video chatting with friends.
Maximize your Zoom settings for the best video call experience
Zoom is one of the best cloud-based video conferencing softwares out there. The company keeps adding more settings, enhancing the overall quality of your video calls. It’s an excellent choice for meeting your business’s online needs.
Take some time to tweak those key settings, thus improving your display quality and your personal appearance, and also helping to address those annoying sound and screen share issues.
Even though these tips add a bit of time to your video conferencing setup, it’s totally worth it. Not only will you have more options at your fingertips, but you’ll be able to educate your meeting participants on how to maximize their Zoom experience.
Our Small Business Expert
Jill A. Chafin is a freelance writer with a background in personal finance, small business solutions, and product reviews, with her work appearing at Life Savvy and on her blog. She specializes in helping sole proprietors understand business deductions, tax terminology, and how to effectively advertise on social media. When she's not writing informative articles, Jill enjoys aerial dancing, working on her novel, making bread, and chasing her two young children.
Share This Page
We're firm believers in the Golden Rule, which is why editorial opinions are ours alone and have not been previously reviewed, approved, or endorsed by included advertisers. The Ascent does not cover all offers on the market. Editorial content from The Ascent is separate from The Motley Fool editorial content and is created by a different analyst team.
The Motley Fool has a disclosure policy.