How to Set Up a Mailchimp Drip Campaign
Drip campaigns are an extremely effective way to ensure your contacts receive the most relevant content at the right time to maximize engagement and conversions. Sending the right messages at the right time to the right segment of customers is one of the main principles of marketing.
Email drip campaigns have a ton of other names, such as autoresponders, automations, lifecycle emails, automated email campaigns, and many more variants on the same theme. They are a really useful way to automate manual processes to not only save you time, but also make your email campaigns more effective.
Not all email marketing software comes with drip campaign functionality, so it’s important to check our reviews to see if this important feature is included.
Mailchimp, for example, has great drip campaign functionality. Other solutions that position themselves as leading Mailchimp alternatives aren’t nearly as good at creating automated email campaigns.
If you’re new to email marketing, it can seem a bit daunting to set up your drip campaigns, which is why this article will take you through how to set up a Mailchimp drip marketing campaign.
Does Mailchimp offer drip campaigns?
Mailchimp provides drip campaign functionality to all its customers, but its free plan and Essentials plan, its least expensive pricing plan, only include single email marketing automations. This means that Mailchimp only automatically sends one email instead of a series when a customer takes certain action.
The types of automation you can send with these two plans are also limited and don’t include an onboarding series and event-based automations, such as when they sign up for an account or the first time they try a new feature.
With Mailchimp’s two most expensive pricing plans, Premium and Standard, you get access to multi-step custom workflows, which means you can send an email series and customize each step of the workflow.
If you connect your e-commerce store, you can also use purchase data to send drip campaigns. This includes abandoned cart emails, feedback on products purchased, and order notifications.
These e-commerce-based drip campaigns are available to all plans, but the free and Essential plans can only use this data to send a single email rather than a series.
What are drip campaigns?
Drip campaigns are automated emails that are sent out by your email marketing software based on customer behavior. They play an important part in direct marketing campaigns. For example, if a customer signs up to your email list, instead of having to manually send them an email, your marketing software will do it for you.
You can either use a single email, or you can set up a series of emails at specific timed intervals.
For example, if a customer signs up for a list, you can choose to just send them a single welcome email. But, if you want to nurture the customer down the sales pipeline, three days after the welcome email, you can send them product recommendations or information on a sale. Then, three days after this email, you can send them a discount code to encourage them to make a purchase.
You can set up multi-step workflows that send out different emails depending on certain conditions.
For example, if a customer visits your website after they receive a welcome email, you can send them a different email than if they don’t take any action. Or if a customer makes a purchase then they will automatically be removed from the welcome series of emails.
How to set up a drip campaign in Mailchimp
While Mailchimp is easy-to-use software, it can still take some time to get used to its functionality.
Below we’re going to walk you through the steps you need to take to create a drip marketing campaign with Mailchimp.
Step 1: Select the right option
It’s easy to find the drip campaign option in Mailchimp, as it’s located in its automation tools menu. When you log in to Mailchimp, you need to click on the “Automate option” from the main menu and then select “Email.”

Select the email option from the Automate menu to kick start your drip campaign. Image source: Author
Tips for selecting the right option:
- Set up Mailchimp first: When you first sign up and log in to Mailchimp, you’ll have to go through a series of questions before you reach this dashboard. You’ll be asked to specify your goal, whether that be to sell products online through an e-commerce store, or whether your main purpose will be for customers to make appointments on your site.
Step 2: Choose the type of automation email
There are a number of templates you can choose from when it comes to creating your first drip campaign, all of which have a specific purpose. For example, you can create welcome emails for customers who first sign up to your list or create date-based emails to say happy birthday.
Mailchimp provides explanations for the templates, so you understand what each one does and choose the most applicable one.
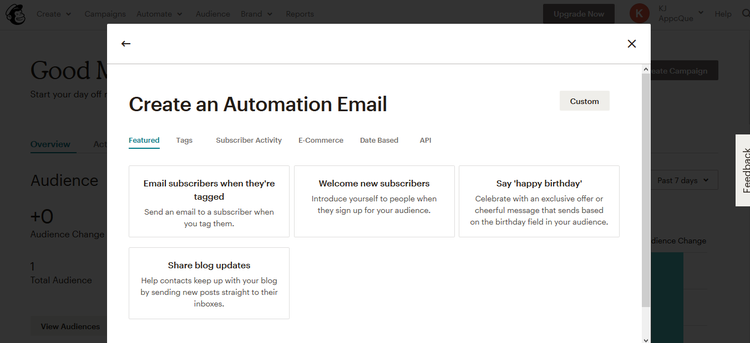
You can choose a template to create a drip campaign. Image source: Author
Tips for choosing the type of automation email
- Create a custom campaign: If you really know what you are doing, you can create your own custom drip campaign rather than using a Mailchimp template. This means you have to choose what to send to customers and when, as well as set up your own workflow.
- Name your campaign: Remember to give your drip campaigns memorable names so that, when it comes to optimizing them, you choose the right one.
Step 3: Set email criteria
Once you’ve decided on the type of automated email campaign, it’s time to set the criteria.
When you set up an automated email, or series of emails, you can set unique criteria for each campaign. For example, you can change the to and from addresses and subject lines.
You can also change when Mailchimp sends the behaviorally triggered emails. This could be one hour, six hours, or one day after they have taken action, such as subscribing to a list.

Mailchimp allows you select different from addresses and subject line for each email. Image source: Author
Tips for setting the email criteria
- Personalize and optimize: If you personalize the subject line, you are more likely to get a higher open rate.
- Verify your domain, and don’t use a free email client: This will improve the chances of your emails ending up in a recipient’s inbox, rather than their junk folder.
Step 4: Create content
Now it’s time to create the content for each email you will be sending out.
Mailchimp has an easy-to-use email editor that lets you customize your emails by adding images, text, videos, buttons, and social sharing buttons. You can also change the style to fit your brand by altering the color, size, placement, and font of each block of content.

Mailchimp’s email editor allows you to fully customize each message. Image source: Author
Tips for creating the content:
- Send a preview email: Make sure you get at least one other pair of eyes on your email, so you don’t send out a message that has errors or isn’t showing up properly.
- Use preview mode: Mailchimp’s preview functionality displays the email as it would look on mobile and desktop, and according to different email clients.
- Check links: Broken links increase the chances of your email ending up in a recipient’s junk folder. That’s why you should use Mailchimp’s built-in link check so you can make sure they are working.
Step 5: Add another email
If you want to add more emails to create a sequence rather than a single email, then you need to edit your drip campaign.
To do that, click on the Campaigns option in the main navigation. Once you are there, select the edit option. Then follow steps three and four to select the criteria and design. Then, test your email.

To edit each automation, choose the relevant option in the Campaigns dashboard. Image source: Author
Tips for adding another email
- Check the status: Make sure the status of your email is set to “sending.” You can check this in the Campaigns dashboard.
- Pause your campaign to make further edits: If you want to be able to send this drip campaign to only a certain segment for a targeted email blast, or you want to change the days these emails are sent, then you need to pause the campaign. You can do this from the main dashboard by changing the status from “Sending” to “Paused.”

You can send each drip campaign to specific segments, or on certain days. Image source: Author
Benefits of email automation through Mailchimp drip campaigns
Creating a superior customer experience by personalizing and tailoring the experience as much as possible is one of the most important email marketing best practices. Using Mailchimp to create drip campaigns lets you do just that and more, as we explain in the benefits below.
- Save time: Automated email campaigns save time in general but Mailchimp also provides the ability to choose a template rather than having to put together the whole campaign yourself. You also have the flexibility to create a custom campaign if you don’t want to use a template.
- Create visually attractive emails: As you can use Mailchimp’s regular email editor to design the messages, you can easily jazz up each part of your drip marketing campaign and customize them to match your brand look and feel.
- Sell more products: If you connect your e-commerce store to Mailchimp then you can further extend the way you use drip campaigns by creating tailored product recommendation campaigns or optimizing your order notifications.
- Nurture your contacts: By creating a series of email campaigns, you can improve your email list management by giving each subscriber more individual attention. Mailchimp allows you to send campaigns to distinct segments, rather than your whole database. This means customers receive tailored, relevant email messages, rather than each and every message you create.
- Access free drip email marketing functionality: Mailchimp includes this functionality in its free plan -- although you can only create single email campaigns with its free plan -- so you can access advanced email marketing capabilities without having to invest in a paid pricing plan.
Advanced functionality, and for free
There’s a reason why Mailchimp is one of the top-rated email marketing services.
Its ease of use and personalized in-app support are important, but its useful features and value for money make it stand out. One example: Mailchimp provides excellent drip campaign functionality for free.
Sure, if you fork out for one of the higher-tier price plans, you get more complex functionality, but Mailchimp automates the process of creating recurring email campaigns so you can focus on creating a winning customer experience.
Alert: our top-rated cash back card now has 0% intro APR until 2025
This credit card is not just good – it’s so exceptional that our experts use it personally. It features a lengthy 0% intro APR period, a cash back rate of up to 5%, and all somehow for no annual fee! Click here to read our full review for free and apply in just 2 minutes.
Our Research Expert
Karen McCandless covers email marketing software for The Ascent, and specializes in business communications and tech.
We're firm believers in the Golden Rule, which is why editorial opinions are ours alone and have not been previously reviewed, approved, or endorsed by included advertisers. The Ascent does not cover all offers on the market. Editorial content from The Ascent is separate from The Motley Fool editorial content and is created by a different analyst team.
Related Articles
View All ArticlesBy: Ben Gran | Published on Jan. 26, 2024
By: Steven Porrello | Published on Feb. 28, 2024
By: Ben Gran | Published on Feb. 27, 2024
By: Maurie Backman | Published on Feb. 27, 2024
By: Chris Neiger | Published on March 2, 2024