A Beginner’s Guide to Video Color Grading
Color grading, although complex, is a cool and fun part of the post-production workflow. After all the edits, sound mixing, visual effects, and color correction comes color grading.
Color grading is the final step in the post-production process and is used to create a look or style with video footage, usually to evoke a mood or emotion. You’ll notice creative color grading in popular movies such as The Matrix, Mad Max: Fury Road, and Pleasantville.
For the most part, color grading is focused on adjusting and fine-tuning the hue, saturation, and brightness (or luminance) of different elements in an image. Colorists will implement different color schemes and palettes from color theory to craft fascinating looks to videos.
Below is an overview of color tools you can use to achieve a color grade. This rundown is more specific to Premiere Pro, but it’s generally applicable to grading in other popular software.
1. Don’t forget to correct
Before you get started creating a mood with your footage, be sure to balance the footage first. Obvious issues with exposure, tones, and white balance make it far more difficult to achieve a desired graded look, as well as shot consistency.
Once all your footage appears natural and neutral, you have a clean slate to get creative with.
2. Apply a creative look-up table (LUT)
Creative LUTs are similar to social media filters, but they’re far more precise and fine-tuned. LUTs add a graded look to footage and can be created and saved as a preset or be downloaded from third parties.
Creative LUTs can be used in any professional video editing software, but to add a creative LUT in Premiere, navigate to the creative panel in Lumetri Color. The dropdown menu labeled “Look” holds all your uploaded and default creative LUTs.
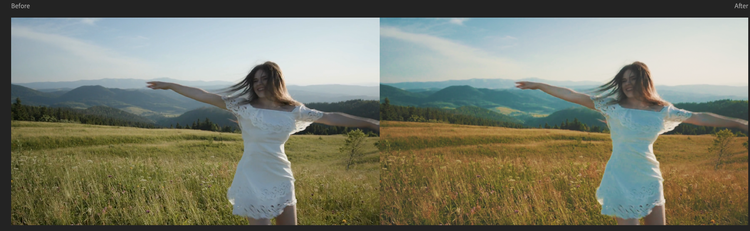
The before and after of adding a creative LUT for color grading. Image source: Author
From there, simply browse and preview the LUT options and click the one you like to apply it to your footage. Additional parameters, such as intensity, vibrance, and saturation, can be tweaked to achieve the desired look.
Creative LUTs are a great starting point for color grading and also establish consistency across multiple shots.
3. Basic correction panel for broad strokes
If you opt to not use a creative LUT, you will probably begin your color grade with basic correction tools. As the name suggests, basic correction tools are mostly used for color correction but have some general use in digital color grading.
As we covered in the color correction guide, you can make broad adjustments to white balance, exposure, tones, and saturation with basic correction tools. When it comes to the grading process, you can use these tools to make adjustments, such as cooling the color temperature to represent nighttime or deepening the shadows in a dark setting.
But the vast majority of color grading will be done with more targeted and sophisticated tools, such as curves or color wheels.
4. Color wheels for each tonal range and matching
The color wheels are almost exactly the same in every video editing software, which is helpful. There are three separate wheels: one controls the shadows, one controls the midtones, and one controls the highlights.
When using the color wheels, move the cursor in the middle of the wheels to make hue and saturation adjustments, and move the vertical slider on the left of each wheel to control the brightness of those tonal ranges.
The color wheels are a good place to create color palettes or work with color schemes. For example, you could create an analogous color scheme composed of adjacent colors from the color wheel, such as the orange, red, and yellows used in scenes of Mad Max: Fury Road. Or you could go for a monochromatic color scheme that uses different shades of the same hue, like the green of every scene in The Matrix.
One of the more popular grades in Hollywood at the moment is the complementary color scheme of orange and teal. To achieve this look using color wheels, you could shift the hue to teal in the shadows wheel and an orange hue to the midtones and highlights wheel. The colors will balance, or complement, each other for an appealing look. However, it’s not exactly that easy and takes more grading using curves and qualifiers, but you get it.
In Premiere, the color wheels panel is also used for shot consistency when it comes to grading. There’s an option to compare two different shots and then apply a match to them. Premiere’s software will analyze the color from the first shot and apply the same scheme to the second shot for easy look consistency.
Also, the color wheels can be used for digital color correction. If the shadows appear warm, slightly move the cursor down toward the blue on the shadows wheel. If the midtones are showing more blue, edge the cursor in the midtones wheel up toward the red. If the shadows are too bright, moving the slider down next to the shadows wheel will lower the exposure of the shadows, and so on.
A few things to keep in mind when using the color wheels for correction. Any alterations made on the color wheels stack on the corrections already made from basic corrections, LUTs, etc. Also, when moving the cursor on the color wheels, start with up, down, left, and right movements. Diagonal movements on the color wheels become more complicated and muddy.
Lastly, the color wheels work in an up-to-down fashion, meaning that if you alter the highlights, it carries down through the midtones and shadows. So start with shadows whenever using the color wheels.
5. Nine different curves
The Curves tool is some colorists’ preferred tool when it comes to both color correction and film color grading. The variety of curves graphs offers detailed control over the color of very specific elements.
In Premiere, there are four separate RGB curves and five Hue Saturation curves that all perform a different function, although some are more commonly used than others. I’ll go over a couple of curves, but I encourage you to read about and explore all the different ones.
One common application of the curves panel is creating an S-curve with the main RBG curve. An S-curve has the same effect as increasing the contrast in the basic correction panel.
To create an S-curve, make a point toward the bottom of the line and drag it slightly downward. Make a second point toward the top of the line and drag it slightly upward. The line takes on an S-shape and brightens the highlights while darkening the shadows to create a standard graded look.
Or, if we were continuing with the orange and teal grade, we could use the Hue versus Sat curve to increase the saturation of any teal in the frame and make it more vivid. You could also use the Hue versus Hue curve to change yellow to a more orange hue to further the grade.
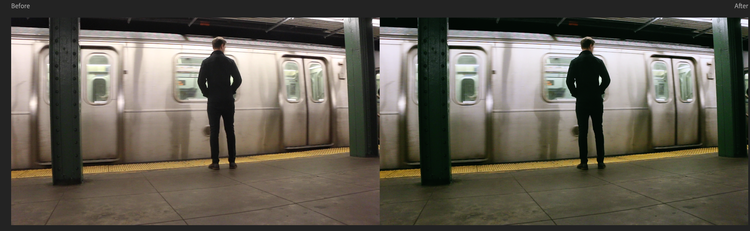
Before and after of a color grade using the curves panel. Image source: Author
If you wanted to create a simple version of grade used in The Matrix, you could use the green curve in the RBG Curve panel to add a green tint to different tonal ranges in your shot. The variety of curves creates a seemingly endless amount of possibilities for grading.
And, just like the color wheels, the curves can also be used for color corrections. The RGB Curve has a curve for white that can be used for exposure, and there are different curves for red, green, and blue that can be used for color balance and exposure. Just like a waveform scope, the bottom of the curve represents shadows and the top represents highlights.
6. HSL Secondary for qualified colors
Finally, the HSL Secondary panel can be used to target specific colors or color ranges by selecting a combination of hue, saturation, and luminance (brightness). It’s common to qualifiers in DaVinci Resolve software.
With HSL Secondary, you could create the different desaturated looks of Pleasantville. For example, the color picker can be used to select a red object in your frame, perhaps a flower. The HSL sliders will fine-tune the range of the red in the flower until the selection is ideal.
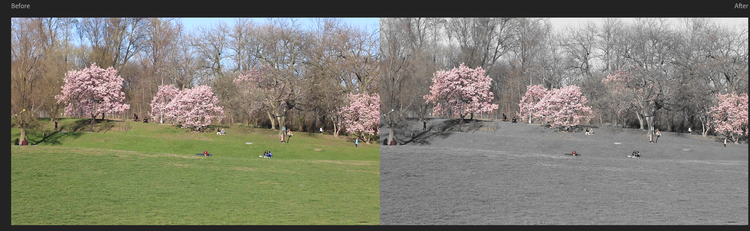
Before and after the color grade using HSL Secondary in Premiere. Image source: Author
Then you could reverse the selection to grab everything besides the flower and desaturate the selection. The end result is footage that’s completely black and white except for a vibrant red flower.
In color correction, HSL Secondary is used for issues such as bad skin tones, mixed lighting, or blown-out highlights.
Exploring color grading
As you can tell from this brief rundown, there are plenty of tools and creative possibilities in color grading. The more you delve into curves, color wheels, and HSL qualifiers, the more cool and innovative color grading you’ll be able to do! Soon enough you’ll be crafting your own professional color grade LUTs that other video editors will want to use.
If you’re looking to color correct and color grade full time, I recommend checking out DaVinci Resolve. Premiere Pro’s Lumetri Color is excellent for color correction and some color grading, but DaVinci Resolve offers more exceptional functionality in the color workspace. It was actually designed initially for color tools and grading, and it’s the go-to software for the vast majority of top-end digital colorists.
Alert: our top-rated cash back card now has 0% intro APR until 2025
This credit card is not just good – it’s so exceptional that our experts use it personally. It features a lengthy 0% intro APR period, a cash back rate of up to 5%, and all somehow for no annual fee! Click here to read our full review for free and apply in just 2 minutes.
Our Research Expert
Matt Kilefner writes about video editing software for The Ascent and The Motley Fool.
We're firm believers in the Golden Rule, which is why editorial opinions are ours alone and have not been previously reviewed, approved, or endorsed by included advertisers. The Ascent does not cover all offers on the market. Editorial content from The Ascent is separate from The Motley Fool editorial content and is created by a different analyst team.
Related Articles
View All ArticlesBy: Ben Gran | Published on Jan. 26, 2024
By: Steven Porrello | Published on Feb. 28, 2024
By: Ben Gran | Published on Feb. 27, 2024
By: Maurie Backman | Published on Feb. 27, 2024
By: Chris Neiger | Published on March 2, 2024