Published April 22, 2024
Combine the powers of both Wrike and Slack by using our simple five-step guide for software integration.
Read on to learn more.
When you think of power couples, what comes to mind? Beyonce and Jay-Z? Ozzy and Sharon Osbourne? Me and my relationship with craft beer?
Since I live in the Pacific Northwest and have a beard, I’m definitely a stereotype, but that’s not the point here. Everyone loves a good power couple. They prove that success is impossible alone, and only when we work with others can we reach our full potential.
When it comes to project management and team collaboration, there’s hardly a better power couple out there than Wrike’s integration with Slack. This power couple is like the work collaboration equivalent of Beyonce’s Crazy in Love with that awesome Jay-Z feature.
Just like you can partake in that song by singing it poorly in the shower, you can also partake in Wrike and Slack’s partnership by following my five-step guide to integrate both tools.
Let’s get to it.
5 steps to integrate Wrike to Slack for project management and collaboration
- Get Wrike and Slack accounts
- Enable Wrike’s Slack application
- Authorize Wrike’s integration in Slack
- Configure notifications in Slack
- Learn Slack slash commands
1. Get Wrike and Slack accounts
Obviously you’ll need both Slack and Wrike in order to integrate them. The great thing about both apps is the fact that you can integrate both using their free versions. You don’t have to upgrade any accounts or pay any extra money to integrate these project management tools. All you need are your accounts, your teams, and your willingness to connect these applications.
If you haven’t pulled the trigger on either tool yet, here’s a brief rundown on both:
Wrike
Wrike is a straightforward and customer-friendly project management software that heavily caters to the Agile market. The interface is simple and easy to use while providing all kinds of useful project functions, including task creation, team management, time tracking, team calendars, resource storage, budget reports, dashboards, and much more.
On top of all of this functionality, Wrike is also very affordable, starting at free for the basic tier and the highest advertised option topping out at $24.80 per month per user. This is a fantastic tool for handling all your project phases and making good on your deliverables.
Slack
I can’t think of a better companion to any project management software than Slack. Chances are you’ve heard of Slack, and that’s because it’s the industry leader when it comes to team collaboration applications. I’ve used Slack for the better part of seven years, and I’ve never been let down. I’ve dabbled with its competitors -- such as Microsoft Teams and Discord -- but those experiences felt like they’re riding Slack’s coattails.
You can create single message threads and entire team-based channels, share links, integrate with all kinds of other platforms (Google Drive, OneDrive, etc.), and even host video conferences.
Pricing for Slack is also competitive since they start off with a limited free option and top out at $15 per month per user for their highest advertised tier. While this pricing is a little higher than the competition, you definitely get what you pay for -- and I mean that in a good way.
Combining Slack with Wrike is the perfect way to ensure a seamless connection between team communications and project management efforts. No longer will you lose information between team communications and project task work.
Once you’ve signed up for both tools, it’s time to move on to the integration setup.
2. Enable Wrike’s Slack application
This step is simple. All you need to kick off the integration is to follow this link, which will take you to a Wrike sign-in page. Once you’re signed into your Wrike account, you’re greeted by this popup window within the application:
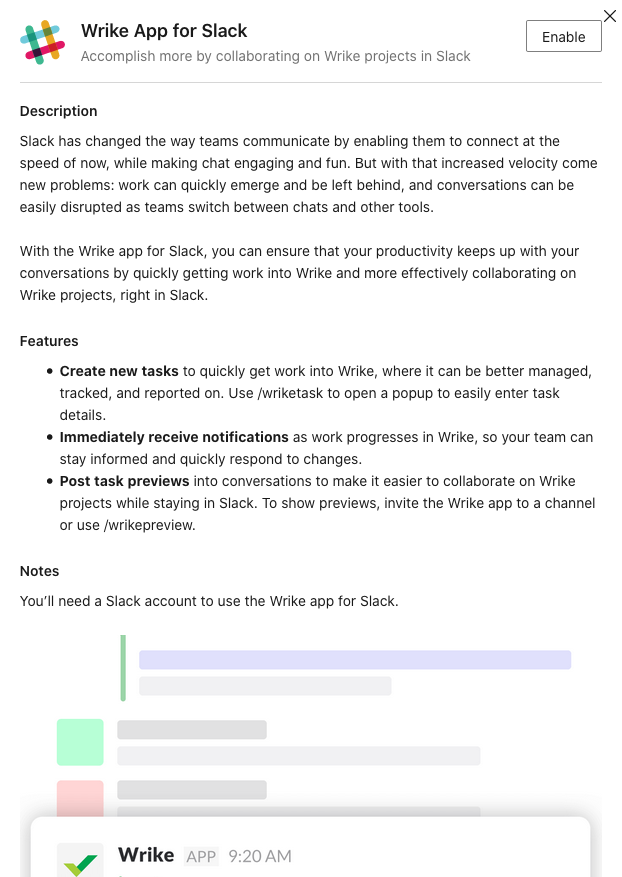
Wrike wants you to know all of the benefits of using its app integration with Slack. Image source: Author
Once you click “Enable,” Wrike will send you over to Slack to complete the integration, which has its own short authorization process.
3. Authorize Wrike’s integration in Slack
After you hit “Enable,” you’re sent to Slack, which prompts you to enter your workspace URL. Depending on the permissions your business has set on your Slack workspace, you’re either immediately connected to the application or prompted to request an install by the application’s managers.
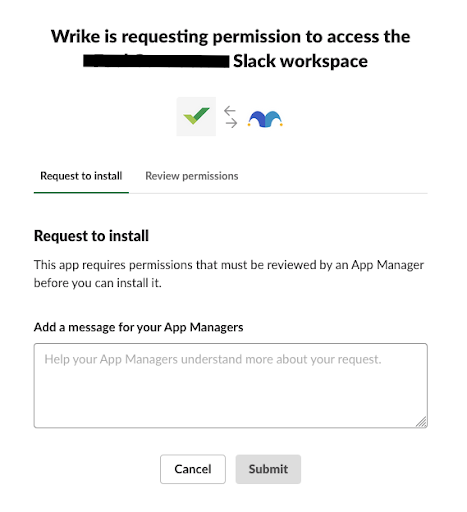
As you can see, I don’t have full access to my team’s Slack workspace, and that’s a good thing for security purposes. Image source: Author
This security is a crucial component of Slack team settings because it prevents outsiders from gaining access to your channels through integration weak points. (Apologies for redacting information from my own screenshot. You’re not invited to my Slack workspace, and my managers said so.)
4. Configure notifications in Slack
Here’s where we configure one of the key components of the integration: Slack notifications.
Half of the benefit of setting up this integration is the fact that you won’t have to switch back and forth between the two tools while taking advantage of them. Notifications will allow you to keep track of everything going on in Wrike while discussing your projects with your team in Slack.
These notifications include every time:
- New attachments are added to a project or task
- Someone comments on a task
- A due date is changed
- A task is created
- A task’s status is changed (in progress, overdue, completed, etc.)
Sounds useful, right? Luckily, the process for setting up these tasks is very simple.
- Just as an FYI, your Wrike notifications are only activated on a per-project basis so you won’t have to receive notifications for every project that exists in your application. First you’ll want to open the folder or project within Wrike and click on the Slack icon in the upper-right corner. It’ll be a little square button, so you won’t miss it.
- You’ll get a small dropdown menu that lists all of the notifications you’ll receive and a button to choose the channel you want to send notifications to.
- Once you click that button, another window will appear with another dropdown menu to select the Slack channel you want to send the notifications to. After you’ve selected your Slack channel, click “Authorize.”
Now that you have notifications set up, you and anyone else with access to this channel will know about every update and change made to the project.
5. Learn Wrike slash commands
The Slack slash commands are bread and butter for a seamless experience with your new Wrike integration. These slash commands are like shorthand typed commands that will turn your Slack channels into Wrike feature-rich experiences.
While this feature is not unique to the Wrike integration and is an integral part of the Slack experience, you’ll find your work moving along quicker by using these commands.
They’re called “slash commands” because each command you type into Slack comments and channels begins with a backslash. It’s kind of like typing “@” before tagging someone in a comment.
These commands include:
- /wrikepreview = Generate a task preview in your Slack channel for other people to see. This task preview will include the task title, the due date, and the assignees for the task.
- /wriketask = Create tasks in Slack that are pushed over to Wrike. This command will prompt a task window to appear in Slack where you can add your task due date, assignees, and description and attach it to a specific project. Once you’re done, just click on “Create” and you’re good to go.
- /wrikehelp = This slash command will generate a list of available Wrike-based commands that are available to you.
If you’re looking for special skills to set you up as the Slack wizard of the office, this is a great place to start. You’ll increase your productivity and blow away your coworkers with your in-depth Slack and Wrike knowledge.
These aren’t the only integrations out there
Buying software is a huge monetary and time commitment for a business. Here at The Ascent, we want to make sure you’re as informed as you can possibly be before making a software purchase. We give you the facts and expertise you’ll need to make an informed decision when comparing all of your options.
That’s why it’s crucial that you stay on top of all of our latest reviews, which include everything from pricing to integration options. The best way to keep up with all of our guides and reviews is to subscribe to our newsletter by entering your email address in the form below. Trust me, your wallet will thank you for it.
Our Small Business Expert
Nick is a seasoned writer and digital marketing specialist with lots of experience in B2B software research. He has always had a passion for technology and has worked as an Apple technical specialist, in the social media startup scene, and also in local DC real estate.
Share This Page
We're firm believers in the Golden Rule, which is why editorial opinions are ours alone and have not been previously reviewed, approved, or endorsed by included advertisers. The Ascent does not cover all offers on the market. Editorial content from The Ascent is separate from The Motley Fool editorial content and is created by a different analyst team.
The Motley Fool has a disclosure policy.