Video Editing 101: How to Use Adobe Premiere Pro
Getting started in Adobe Premiere Pro can be a daunting task for the first-time user, or even those familiar with other Adobe products like Photoshop and Illustrator. When I first started, I didn’t even know the proper way to open a project! But after learning a straightforward and structured workflow, I was able to learn video editing from start to finish.
To be the most practical, let’s go through an example video using a common workflow. These Adobe Premiere tips will take you from the very beginning to the absolute end of the video editing process in Premiere.
1. Gather and log your media
First step -- Collect all the media (footage, audio, graphics) you plan to use. It’s OK to add more media as you continue through the editing process, but it’s most efficient to have the vast majority of your media organized before you get started. Arranging your project folder properly is highly encouraged.
The next step in the pre-editing process is logging footage, or labeling your footage. The labels should be a description of the shot to help you easily identify and organize clips. For example, a clip may be labeled 12/20/20_coupleinkitchen_CU_03: it has the date, a quick description of the shot, the shot type, and the take number. I suggest logging footage whether your project has two files or two thousand.
If you have only a handful of files you’re working with, it’s easy to log the footage prior to opening up a project. If you have far more files, you can label the files within Adobe video editor.
2. Create a new project and sequence
When opening a project in Premiere Pro for the first time, it’s best to stick with default settings. You only have to pay attention to two things: The project name and the location. The name is self-explanatory, but the location is where your project is saved, so make sure it’s directed to your project folder and you can find it later.
Once you open up to a blank, editing workspace, drag and drop your project folder from your hard drive into the project panel. Your files will populate as you have them organized and you’re almost ready to get editing!
To finally get started, you need to create a new sequence. You can do this a couple of ways: Drag and drop a clip from your project panel into the timeline and it will create a sequence with the same settings as the clip (e.g., 1920 x 1080, 29.97 frames per second).
Or you can use the shortcut Command+N on Mac or Control+N on a PC to open up the settings for a new sequence. When creating a new sequence from scratch, take note of these settings:
- Timebase: Should match or be lower than that of your footage -- 23.97 and 29.97 are most common.
- Frame size: Should match your footage or the platform you intend to post on. For example, a typical HD video is 1920 x 1080 with an aspect ratio of 16:9; an Instagram-type video will be 1080 x 1080 with a 1:1 aspect ratio.
Working with frame rates and frame sizes different from your footage will cause issues, so to make things easier, I recommend dragging and dropping a clip to initiate a sequence. If you’re using your video for omnichannel marketing purposes, it is especially important that these settings fit each platform you post to.
3. Create a stringout in the timeline
Now it’s time to start piecing together your video. The process of constructing your story from the media you imported is referred to as creating a stringout -- think of it as a really rough cut.
Depending on the size and type of project, you may go through the process of choosing selects before you create a stringout. Choosing selects refers to picking the best takes from each scene. If you’re creating a short social media video, you’ll likely skip choosing selects; it’s more common to do this for large TV or movie projects.
To create your stringout:
- Navigate to the project panel and double-click the footage or audio you want to work with. The media will populate in the source monitor.
- Use the source monitor to trim down your footage or audio to the parts you want. Using the command “I” will choose an in point, or starting point, and the command “O” will choose an out point, or ending point.
- Transfer your selection to the timeline using the comma or period key.
The above system is referred to as three-point editing and is the most efficient way to edit in most video editing software. You can also drag and drop media from your project panel straight into the timeline and trim from there.
4. Fine-tune the edit
Now that you have a rough layout of your video in the timeline, it’s time to polish it. This step could consist of a range of actions: trimming clips or expanding clips, syncing audio and video more precisely, or developing a pace, among other things.
There aren’t many practical tips to this step, it’s just getting to your video to the point where there is no more trimming, cutting, or rearranging. You want the placement and duration of your clips to be set before jumping into the next steps.
5. Sound design
Premiere has a good number of tools for audio editing and mixing. At the very least, you should adjust your volume levels. For this example, there is both a voice track and music track on the timeline and we’ll look at ducking the music levels so the voice track can break through.
There are a few ways to do this, but let’s look at Premiere’s audio assign function:
- Open the audio workspace
- Toggle the voice track in the timeline
- In the right panel under Essential Sound, you’ll see the options to assign a tag to the audio clip
- Assign the Dialogue tag
- Toggle your music track and assign the Music tag
- While in the Music tag, select the Smooth Vocal Ducking preset
- Adjust the amount you want the music to fade using the Duck Amount slider
- Click Generate Keyframes
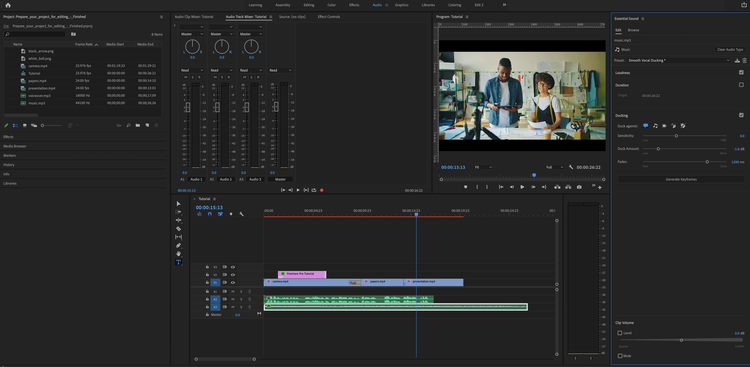
The Audio Assign function in Premiere Pro used for easily mixing audio tracks. Image source: Author
All done! Now when the voice track comes in, the music will fade slightly underneath the voice volume. Audio mixing can sometimes be overlooked, but it’s one of the components of a great video.
6. Transitions and effects
Seamless transitions and cool effects are a great way to support a theme, add style, and assist in timing. Take your time and do a deep-dive into the collection of transitions and effects Premiere Pro offers and the best ways to use them. For this Adobe Premiere Pro tutorial, let’s add a push transition between two clips and drop an offset effect on top of one of the clips.
Adding a push transition:
- Open the Effects workspace
- Open the Video Transitions drop down menu
- Open the Slide drop down menu
- Drag and drop Push Transition on the end of the first clip
- Adjust the duration, direction, and other settings in the Effects Control panel
Adding offset effect:
- Open the Effects Workspace
- Open Video Effects drop down menu
- Open Distort drop down menu
- Drag and drop Offset onto the desired clip
- In the Effects control panel adjust the “Shift Center To” setting
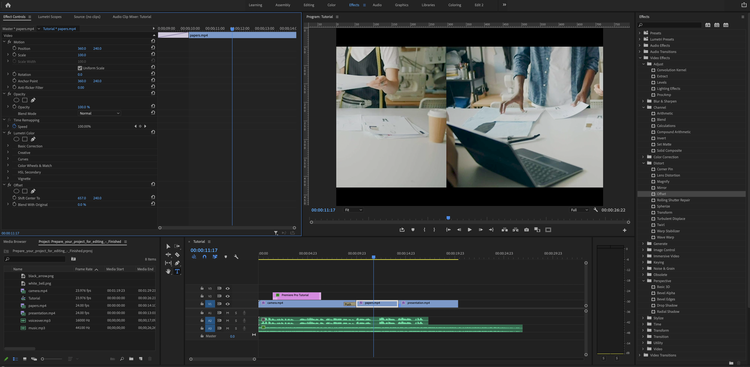
The offset effect dropped onto a clip in the timeline from the Effects panel. Image source: Author
7. Motion graphics
Motion graphics continue to gain popularity and it seems you can’t create a video without them anymore. They are excellent for title sequences, lower thirds, and more. Let’s add a title to this video using one of the templates in the Graphics workspace:
- Open the Graphics workspace.
- Hover over the templates for a preview until you spot one you like.
- Drag and drop right onto your timeline.
- Double-click your template in the timeline to change the text .
- Adjust all the other settings in the Effects Control window.
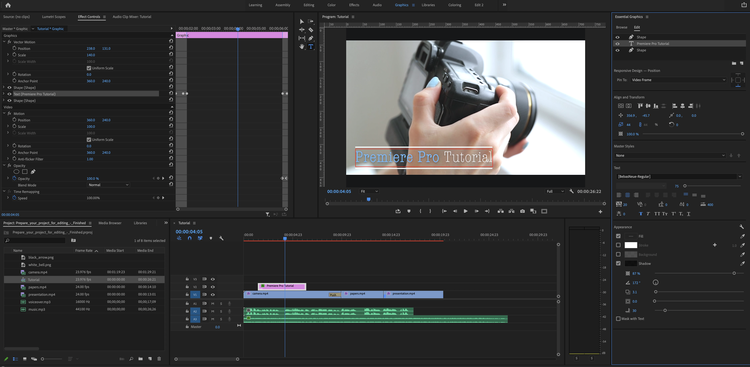
A title made from a motion graphics template in Premiere Pro. Image source: Author
As you continue to work with these templates, you’ll get a better grasp of the Effects Control window in Adobe video editing and the adjustments you can make there. To start, it’s OK to leave the default settings.
8. Export
You’re all done! Now it’s time to export your work to your social media account, landing page, videographer website, and everywhere else. There’s a lot of export settings but we’re going to focus on the format and preset options for quick and easy encoding.
- Format: H.264 --The format is also known as a codec and is how the video is compressed and decompressed (CoDec) for sending and opening. I recommend using H.264 almost always because it’s excellent for file size management and is compatible almost everywhere.
- Preset: Match Source Medium Bitrate -- The preset will determine your video settings so you want those to match your sequence settings. The bitrate will determine the quality of the video. Unless your video is loaded with 3D rendering, heavy color grading, and endless effects, you’ll be fine with medium bitrate.
Customizing your workflow
The above workflow is a useful basic editing guide for beginners. As you continue to edit, you’ll tailor the system to fit your editing style and add steps like color correction and advanced compositing.
Of course, you don’t have to follow the outline exactly. But use this template as a starting point and soon enough you’ll have your own workflow down to a tee!
Alert: our top-rated cash back card now has 0% intro APR until 2025
This credit card is not just good – it’s so exceptional that our experts use it personally. It features a lengthy 0% intro APR period, a cash back rate of up to 5%, and all somehow for no annual fee! Click here to read our full review for free and apply in just 2 minutes.
Our Research Expert
Matt Kilefner writes about video editing software for The Ascent and The Motley Fool.
We're firm believers in the Golden Rule, which is why editorial opinions are ours alone and have not been previously reviewed, approved, or endorsed by included advertisers. The Ascent does not cover all offers on the market. Editorial content from The Ascent is separate from The Motley Fool editorial content and is created by a different analyst team.
Related Articles
View All ArticlesBy: Ben Gran | Published on Jan. 26, 2024
By: Steven Porrello | Published on Feb. 28, 2024
By: Ben Gran | Published on Feb. 27, 2024
By: Maurie Backman | Published on Feb. 27, 2024
By: Chris Neiger | Published on March 2, 2024