Step-by-Step Guide to Motion Tracking
Motion tracking sounds like a complicated concept, but it’s completely doable for even those with limited video editing experience. Once you learn how to motion track, you'll notice it’s used in everyday social media videos, Hollywood blockbusters, and everything in between. Let’s get started!
Overview: What is motion tracking?
Motion tracking, or mask tracking, is the process of following a moving object within a video. For the most part, you’re following the movement with a mask, hence the term mask tracking. Motion tracking is done using position keyframes and opens all kinds of creative and color possibilities in Premiere. Although not as dynamic or functional as motion tracking in After Effects, Premiere’s tracking features are efficient and come in handy.
If you’ve just started learning how to edit videos in Premiere, check out Premiere Pro for Beginners before diving into this video editing tip.
4 uses of motion tracking effects
Motion tracking in video editing is an awesome tool to have in your repertoire. With motion tracking, you can add cool effects to objects in your video, or move elements around.
There are two main ways to motion track: mask path or manual position keyframing. As the name suggests, the mask path option works to move a mask with effects. The second option is simply changing the position of an element over time with the position parameter -- this is used when you’re not tracking a mask.
Below are some common uses for motion tracking.
Color correction and grading
One of the most common reasons for tracking movement is color correction and color grading. For example, if you are changing the color of a character's hair, you have to mask and follow the character’s hair throughout the scene to apply the color change consistently.
Frame blocking transition
Frame blocking is a cool transition to use when changing scenes or locations in a video. In a frame-block transition, an object moves across the screen and the clip will change as the object passes. It’s accomplished by mask tracking the opacity of a video layer to become visible only as the object passes by.
For example, one clip may have a character walking across the frame from left to right. As the character moves, they will reveal a new video layer behind them.
Blur faces and objects
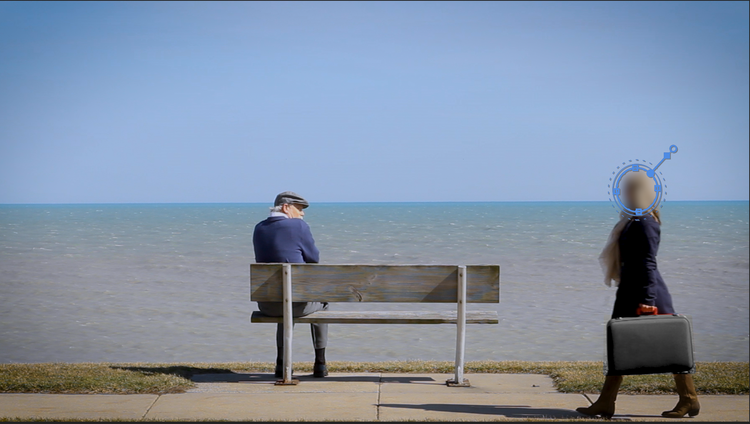
You’re watching a documentary and an unidentified informant is giving an interview with his face blurred. To ensure the informant doesn't expose his face, the blur has to follow his face and movements. Mask tracking is used to move the blur effect along with the informat’s head movements.
Text motion
Video text effects are different from the first three examples because a mask isn't used, so the tracking is done by hand with position keyframes.
Tracking text would be used in a situation such as a label hovering over a person. As the person moves, you’ll have to track the text layer to pursue. Again, this type of effect would be done manually with the position parameter frame-by-frame because there is no mask.
How to use motion tracking when editing your videos
Motion tracking is easy to use within Premiere Pro -- everything is done in the Effects Control panel. When tracking a mask, users have the option of motion tracking manually, automatically, or a combination of both. The best and most efficient results come from blending the two. Unfortunately, there isn’t automatic functionality when tracking an element without a mask.
Let’s go through an example of how to blur a face and change the color of an object in a moving scene.
1. Add the effect to the clip
First step, add the effect you want to track. For this example, we’re blurring a face and changing the color of the subject’s suitcase, so I’ll add the Gaussian blur effect and Lumetri color to the clip.
2. Create a mask
The process of drawing out a workable mask can be tedious -- it’s meticulous work -- but it’s an important step. If you start off with a poorly done mask, the effect you’re trying to achieve won't look as clean. To create a viable mask, follow the steps:
- Navigate to the Effect Controls panel and find the effect you added.
- Start a mask using the ellipse, rectangle, or free draw tools -- make sure you are creating a mask for the specific effect and not another parameter in the effects control panel.
- Carefully place or draw your mask over the object you want to track.
- Fine-tune your mask by moving the created motion tracking points on your mask, and the bezier handles attached to each point. Add another point by clicking along the edge of the mask.
- Adjust the mask expansion and mask feather as needed. Expansion can be altered using the solid square on the mask, and feather can be altered using the empty circle on the mask. Both can also be adjusted in the effects control panel.
- In most cases, you’ll want to add at least minimal feathering to reduce harsh edges and blend the mask in with the background.
An ellipse mask showing handles for mask expansion and feather. Image source: Author
When creating the mask, change the zoom level in the preview monitor so you can drop more precise mask points. This is one of the longer steps in the process, so don’t be discouraged by how slow it can be.
3. Change the effect values
Once you’re satisfied with your mask, it’s time for the fun part -- crafting the effect! Keep in mind, the added effect will be traveling with the mask throughout the scene, so don’t overdo the effect.
For the Gaussian blur, I’ll increase the Blurriness level to about 25 to adequately hide the subject’s face. You can also use the mosaic effect in place of Gaussian blur if you prefer that.
And for the Lumetri color effect, I'll take the saturation to 0 in the basic correction panel to change the suitcase from red to a grey.
4. Auto track mask path
Premiere’s video editing software has an awesome feature called “Auto track mask path” that will follow the object you masked and create position keyframes for the entire clip. This feature, for the most part, saves you from going frame by frame and adjusting the position of your mask to cover and follow the motion of the object.
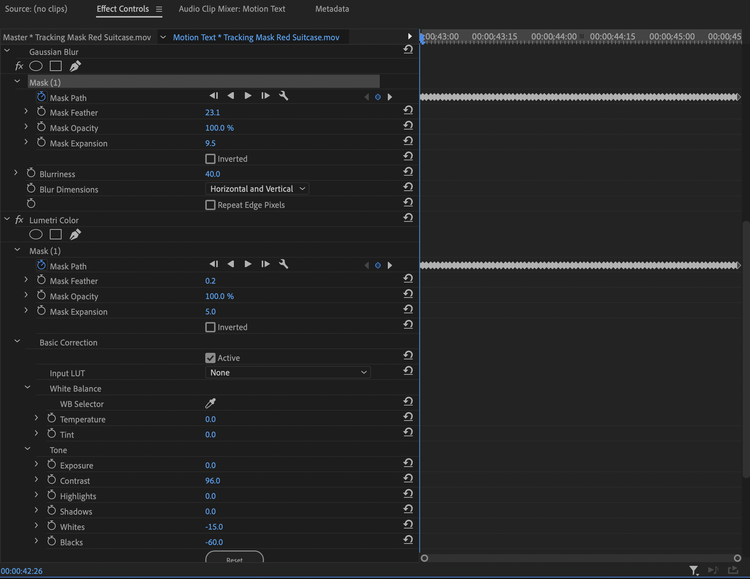
The mask path keyframes created for each effect using the “Track selected mask forward” tool. Image source: Author
To begin, scroll the playhead back to the beginning of your clip. The automatic tracking will start from wherever the playhead is positioned, so if it’s not placed at the first frame of the scene, the tracking will miss some of the clip.
Once the playhead is set, navigate to the mask path parameter within your mask in the effects control panel. Press the play button labeled “Track selected mask forward,” and Premiere will create the path keyframes for you.
5. Adjust the track path
Although the automatic tracking has created all the keyframes, it’s best to slowly scroll through the clip to check the tightness of the mask. Automatic tracking does a pretty excellent job of closely fitting the motion, but there will be some frames where you will need to tidy up a straying mask.
To fix the mask in a sloppy spot, just move the mask or adjust the outside points of the mask in the source monitor. Premiere will adjust the keyframe value to match the new position you created.
Generally, the more spread out over time the keyframes are, the smoother the motion is. But, use as many key frames as it takes to ensure an effective mask.
You’re all done! Enjoy your effect as it fluently tracks movement across the frame.
The before and after of motion tracking the blur and color effects. Image source: Author
Finding creative ways to mask track
Being an expert motion tracker opens the door to many artistic possibilities. When done right, motion tracking can change colors, add exciting effects, create transitions, move text all over the screen, and more. As you work with masks and tracking further, look for ways to incorporate the tool into your daily editing and creative workflow.
For more video editing guides, check out these Adobe Premiere Tips.
Alert: our top-rated cash back card now has 0% intro APR until 2025
This credit card is not just good – it’s so exceptional that our experts use it personally. It features a lengthy 0% intro APR period, a cash back rate of up to 5%, and all somehow for no annual fee! Click here to read our full review for free and apply in just 2 minutes.
Our Research Expert
Matt Kilefner writes about video editing software for The Ascent and The Motley Fool.
We're firm believers in the Golden Rule, which is why editorial opinions are ours alone and have not been previously reviewed, approved, or endorsed by included advertisers. The Ascent does not cover all offers on the market. Editorial content from The Ascent is separate from The Motley Fool editorial content and is created by a different analyst team.
Related Articles
View All ArticlesBy: Ben Gran | Published on Jan. 26, 2024
By: Steven Porrello | Published on Feb. 28, 2024
By: Ben Gran | Published on Feb. 27, 2024
By: Maurie Backman | Published on Feb. 27, 2024
By: Chris Neiger | Published on March 2, 2024