Published April 22, 2024
Photos are an essential component of online sales. A professional photo can improve the number of online sales that your e-commerce business makes.
Learning how to take good product photos is a skill that can enhance your business. Photos are an essential component at every point in the product life cycle. Good product photography is useful in the development and testing of new ideas as it helps the consumers visualize the product.
Product photos are also an integral part of how to market a product online. They accompany the product description and give the consumer an idea of the product quality. For 93% of consumers, the key deciding factor in a purchase is the visual appearance.
Mastering a few basic product photography techniques will help to present your product in the best possible way to potential customers.
Consider the following product photography tips:
1. Select the right camera and settings
A camera is the most important element in a product photography shoot. The right camera will help you get clear, crisp photos. Ideally, you want to use a digital single-lens reflex camera (DSLR) or a smartphone camera.
The camera settings for product photography are important. When using a DSLR camera, don’t use a wide-angle lens. It will distort your product. A wide aperture like f2.8 or f4.5 will narrow your depth of field. A small aperture like f8 or f11 will give you a wide depth of field. It will keep your entire product in focus. You can use a low shutter speed for product photography because you aren’t dealing with motion.
When shooting your product, use the correct white balance. Most cameras have an auto white balance setting. Set the camera to the same Kelvin temperature as your lights or use one of the white balance pre-settings.
A smartphone camera will work well too for those just getting started who don’t have the budget for a new camera. You can get professional-looking photos from your smartphone if you have the right lighting and background. This may take a bit of trial and error.
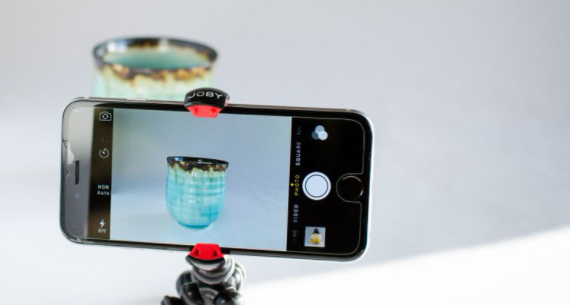
Smartphone cameras can produce professional photos when the lighting is right. Image source: Author
2. Use proper lighting
Without proper lighting, a white background will appear gray. The product can have bright colors, but if the lighting is poor, they won’t be viewed well. The two main options for product photography are natural lighting and studio lighting.
Natural lighting works well for edible items, people, and clothing. Naturally lit photos work well in social media campaigns. For indoor photos with natural lighting, you will want to set up your product facing a window in the early morning or late afternoon.
Products that are used indoors need artificial lighting. When shooting photos with studio lighting, you should use two lightboxes to get the shadows right. One light will serve as your key light, and the other will be the backlight.
The main light will be placed in front of the product with the backlight on the opposite side slightly behind the product.
Adjust the lights until you get soft, evenly distributed shadows. It may be helpful to place cloth over them to diffuse some of the light for softer shadows.
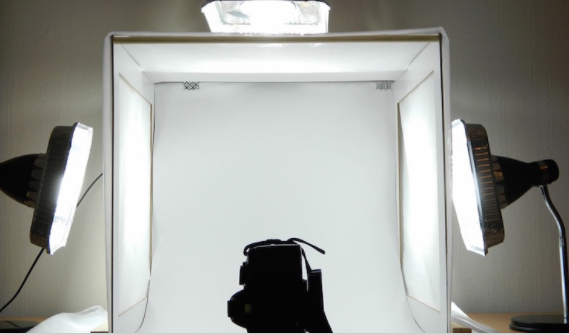
Light sources on both sides of the product will reduce the shadows. Image source: Author
3. Set up the background
When taking product photos, you want to have two types of photos -- one with just the product against a white background and the other with the product being used. A white background simplifies the editing process. It draws the viewer's attention to the product.
The backdrop does not have to be fancy or expensive. You can use craft paper to create a white backdrop. A simple white sheet will also work well.
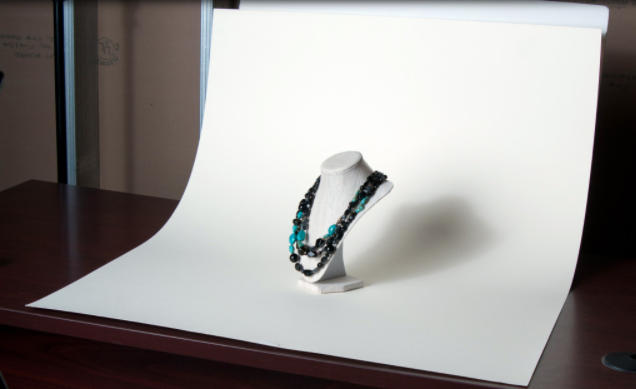
The white paper background allows the viewer to concentrate on the details of the necklace. Image source: Author
4. Use a tripod
Tripods make a huge difference in the clarity and quality of your product photography. They steady the camera from your shaky hand, which will reduce the blur in your photos.
Whether you are using a fancy DSLR camera or an iPhone, it is worth it to spend a few extra minutes to set up a tripod. Eliminating the blur will produce clear, crisp, professional-looking images.
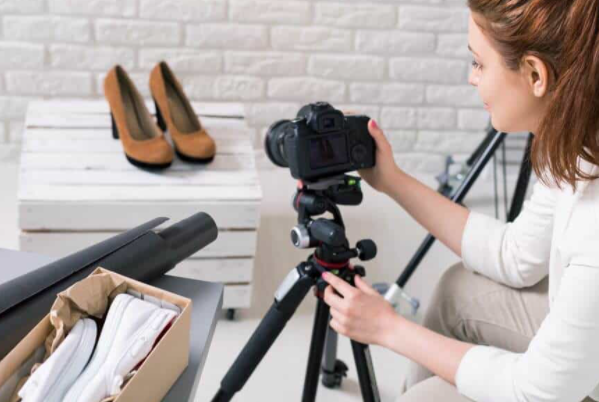
The tripod provides a steady camera to ensure that there isn’t motion when capturing the picture of the product. Image source: Author
5. Gather inspiration from your favorite brands
Your favorite brands are favorites for a reason. Most likely they have product photos that resonate with you. Take a look at their product photography and figure out what you love about the photos. Ask yourself how a similar shot could work for your products.
For instance, if you own a women’s boutique, check out your favorite women’s clothing brands on Instagram. What do you love about their product photos?
6. Learn the rule of thirds
In art, there is a rule of thirds. It teaches you to view your canvas in 9 segments. It was designed to help artists create a balanced work of art. It also helps photographers determine where to place the focus of the product photograph.
The goal should be to have your product positioned along the lines or where two lines intersect. When viewing photos, people's eyes are drawn to the points of intersection rather than to the exact middle of the photo.
In the photo below, we see that the light bulb lines up along the intersection of the bottom line and the middle lines. Your eye is drawn to the bottom two-thirds of the photo.
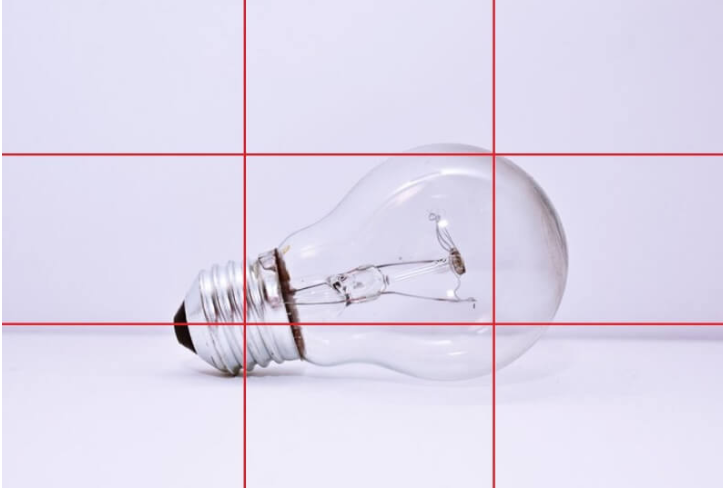
The points where the thirds intersect are where your eyes are naturally drawn in a photograph. Image source: Author
7. Use simple props
When it comes to photography props, the simpler the better. The main focus of the product photograph should be on the product. Props can add some interest and brighten the photograph, but should not detract from the main product. You also don’t want to confuse the viewer about which item is the product.
Keep the props simple, aligned with the color scheme, and relevant to the product. For example, if you are shooting ice cream, a bowl would be a simple, relevant prop.
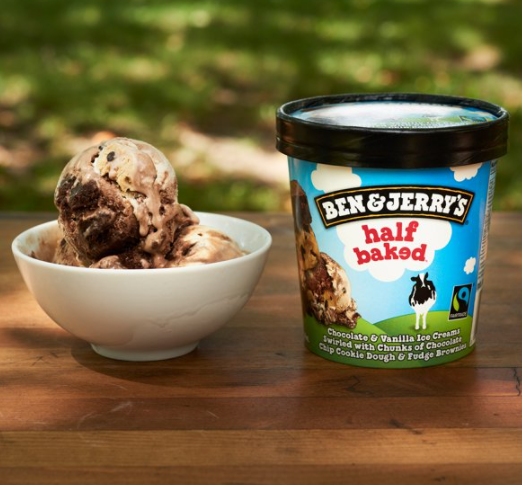
A bowl of ice cream is a simple prop to demonstrate the quality of the product. Image source: Author
8. Take multiple shots from varying angles
Sometimes it can be tempting to take one or two shots from an angle that looks perfect but when you view the final photograph it isn’t always as perfect as you thought. Multiple shots from varying angles give your viewers a better idea of the whole product. It gives you a variety of photos to select for the final product page.
Shoot some angles from above and include a few side angles. For clothing, people want to view the front and the back of the garment.
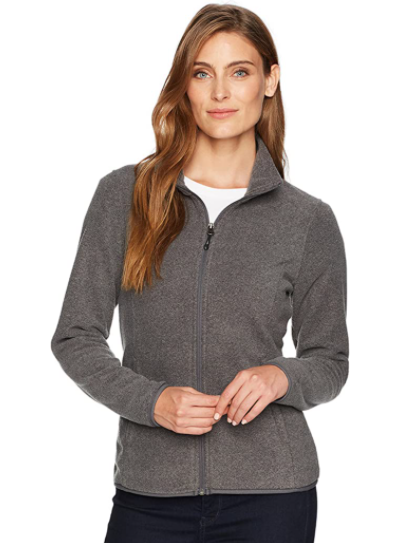
A frontal view of clothing helps customers imagine what it will look like. Image source: Author
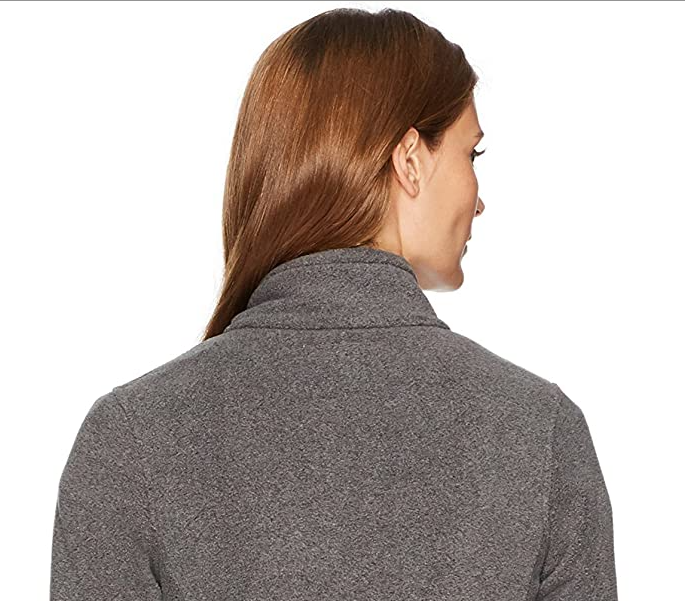
A back view allows consumers to know what the full jacket will look like. Image source: Author
Detailed images can help to display the quality of the product. Image source: Author
9. Take photos in context
Prospective customers want to envision themselves using an amazing product. When you have done a great job with product photography, it is easy for the viewer to picture the product in their lives. After all, if the person in the photo is happy using the product, why wouldn’t the customer buy it?
Before anyone purchases something, they need to feel confident that the product will improve their daily life somehow. Products that are removed from context and simply have a backdrop don’t give the consumer the chance to envision themselves using the product.
For example, someone who is shopping for gardening tools may not be able to envision how they work with a white background. A photo in context can help the consumer visualize how the product will work for them when gardening.
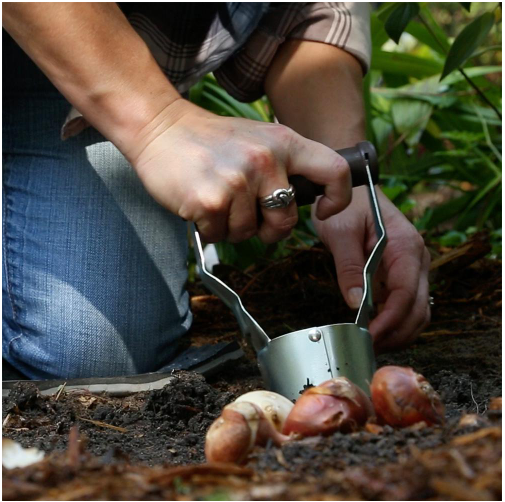
The photo demonstrates using a bulb planter in the context of gardening. Image source: Author
10. Retouching the images
To achieve a professional and polished look on your product photography, it is important to retouch and edit your images. This can prevent them from looking mediocre.
When you are just starting, getting the background and lighting requires a lot of trial and error. Photo editing software can make a lot of mistakes seemingly disappear.
Retouching can cover color correction, background removal, or shadow removal. In the beginning, photo editing and retouching can be a time-consuming process until you get the hang of it.
Editing out the shadows and the gray background focuses your attention on the product. Image source: Author
There are plenty of image editing tools online. Many have free versions with basic photo editing tools that you can test out before investing in their full functionality.
Online image editing tools:
- Pixlr: similar to Photoshop functionality
- Canva: free online photo editing best suited for marketing
- Fotor: easy to use smartphone app
- Snapseed: free mobile app
Product photography impacts sales
Online store marketing relies heavily on great product photography. The right lighting and placement ensure that your product will be portrayed well on e-commerce platforms to the customer. If the product looks cheap or dingy, sales will be impacted.
Product photos that demonstrate the product in use are also very helpful to the consumer. Seeing someone else actually using the product allows the consumer to picture themselves using the product.
If you want to be successful at selling online, you need to become good at product photography. It may take a bit of trial and error, but with a bit of practice, you can learn to take excellent product photos and edit them to look professional.
Our Small Business Expert
Melinda Curle is a seasoned writer with experience writing books, blog posts, and newsletters on digital marketing. She specializes in small medical practice strategies and e-commerce. When she's not researching and writing, Melinda enjoys playing the piano and learning archery with her nephews.
Share This Page
We're firm believers in the Golden Rule, which is why editorial opinions are ours alone and have not been previously reviewed, approved, or endorsed by included advertisers. The Ascent does not cover all offers on the market. Editorial content from The Ascent is separate from The Motley Fool editorial content and is created by a different analyst team.
The Motley Fool has a disclosure policy.