Published April 22, 2024
QuickBooks Online is a great tool to manage your small business accounting with ease. Here are step-by-step instructions on how to use QuickBooks Online.
After reading numerous accounting software reviews, you’ve made the decision to use QuickBooks Online software.
Great choice!
However, as a new user, you may be feeling a little overwhelmed right now. Even though QuickBooks Online is user friendly, it might help to get a little more acquainted with some of its bookkeeping features, which include double-entry accounting.
In this QuickBooks Online tutorial, we’ll cover some of the most common tasks you’ll be performing in QuickBooks Online, showing you just how easy it is to use.
How to use QuickBooks Online
Now that you’ve decided on the software, are you wondering how to use it?
Our QuickBooks Online introduction can help, guiding you through some of the common features found in the software as well as providing easy, step-by-step instructions for using those features.
1. How to set up QuickBooks Online
As a new user, the first thing you’ll have to do is set up QuickBooks Online for your business.
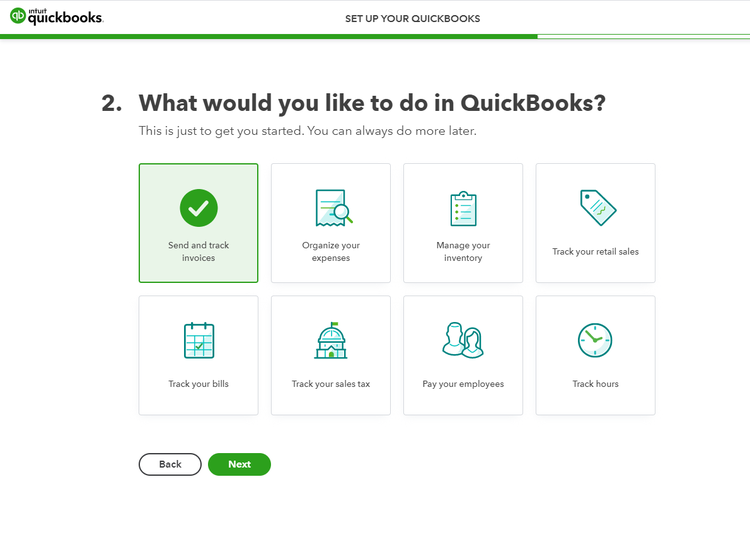
During setup, you can choose the features you’ll be using in QuickBooks Online. Image source: Author
Perhaps the most important task in QuickBooks Online is the initial setup process. After logging into QuickBooks Online for the first time, you’ll see a display screen where you can choose the features you’ll be using in the application.
Your options include:
- Send and track invoices
- Organize your expenses
- Manage your inventory
- Track your retail sales
- Track your bills
- Track your sales tax
- Pay your employees
- Track hours
Click on the features you’ll be using. No need to worry if you skip one; you can go back and add others later.
When you’re done with this, QuickBooks Online is ready to use.
Tips for using the setup feature in QuickBooks Online:
- Think ahead: While you may be tempted to just click on the features you’ll use immediately, approach the setup process in terms of where you see your business going. If you plan on selling products in the future, go ahead and choose the Manage your Inventory option now, eliminating the need to add it later.
- Don’t skip the 30-second tour: While you may want to just jump in and get started, don’t skip the offer for the 30-second tour that pops up on the screen.
2. How to set up and use the bank connection feature
QuickBooks Online gives you the option to connect your bank accounts directly to the software. By connecting them, you can easily track both income and expenses in QuickBooks Online automatically, reducing the amount of data entry required.
Connecting your bank or financial institution also ensures that your account balances are current and reports are accurate.
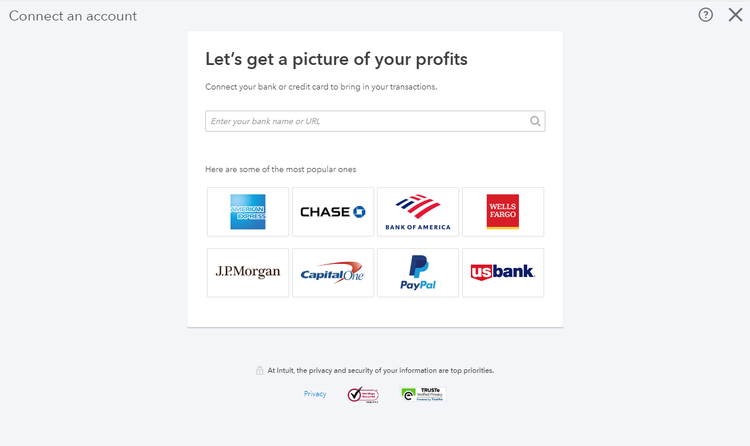
The Connect feature in QuickBooks Online lets you connect all of your bank accounts. Image source: Author
Connecting your accounts is a three-step process:
- Choose the financial institution you wish to connect.
- Log in to the bank account with your username and password for the account.
- Once connected, choose the account(s) you wish to connect.
Once you choose the account(s) you wish to connect, QuickBooks will automatically download transactions for the last 90 days, and it will continue to automatically download transactions on a regular basis, ensuring that your balances are always up to date.
You can repeat these three steps for each account you wish to connect.
Tips for connecting your bank accounts in QuickBooks Online:
- Decide whether or not to connect your accounts: Many users are initially squeamish about connecting their bank accounts to QuickBooks Online, citing security concerns. If you’re unsure, you can initially opt not to connect your accounts and instead do so later, when you’re ready.
- Choose which accounts to connect: If you do decide to connect your accounts, decide whether to connect all of your accounts, or just the account(s) you use for your business. Keep in mind that it may be useful to connect other financial institutions such as your credit card accounts as well.
3. How to categorize bank transactions
Once you set up your bank connection, you can start categorizing all imported transactions. The nice part about this is that much of the transaction posting is completed automatically, making month-end reconciliation a breeze.
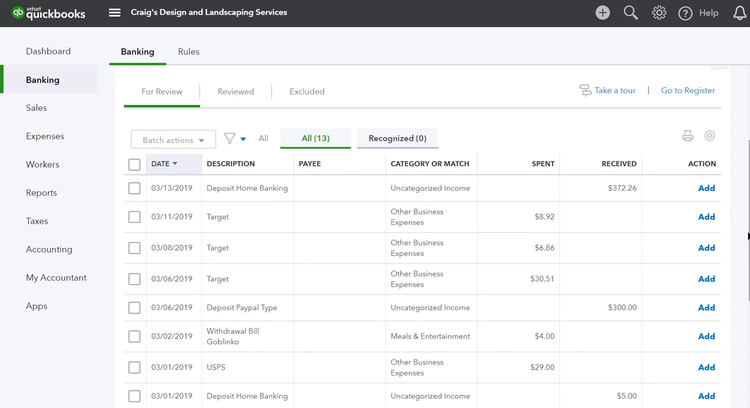
The Banking feature in QuickBooks Online displays all imported transactions for easy matching. Image source: Author
When you’re ready to review imported transactions, simply follow these steps:
- Go to the Banking menu and choose the bank account you want to review.
- Click on the the For Review tab, which displays all recently downloaded transactions.
- Review each transaction for accuracy.
- If QuickBooks Online has found a match, and it is correct, click on Match.
- If a transaction has not been matched, enter or approve the category QuickBooks Online suggests, then click Add to add the transaction.
- Once added, click the Reviewed tab to double-check transactions for accuracy.
Tips for categorizing bank transactions in QuickBooks Online:
- Review your bank transactions daily: A good way to stay ahead is to review imported transactions daily. This way, both income and expenses are accurately accounted for at all times.
- If you have limited transactions, you can import them monthly: There’s no need to import and review transactions daily if you average only one or two a week. Instead, manually download your transactions monthly, and if you find they start to increase, you can always switch to importing and reviewing transactions daily.
4. How to set up invoice preferences
As a small business owner, it’s likely that invoicing will be the most important feature you’ll use in QuickBooks Online.
In order to make your invoices stand out to your customers and get paid quicker, be sure to set up your invoice preferences prior to sending out your first invoice.
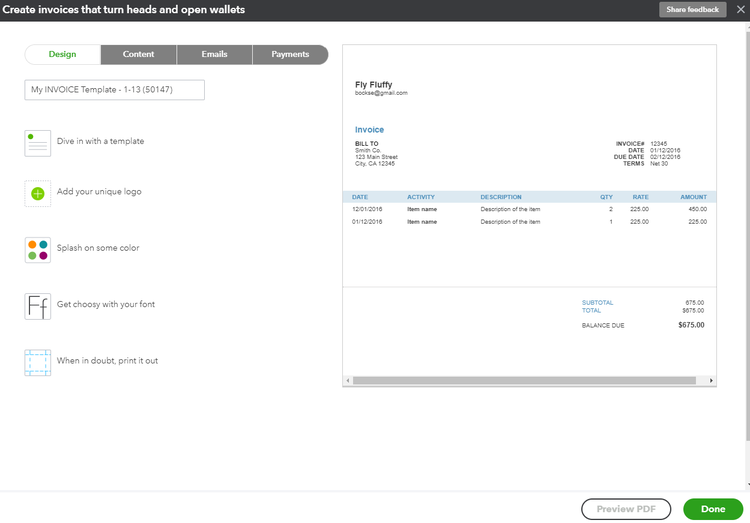
The Customize Forms feature in QuickBooks Online lets you easily customize invoices. Image source: Author
Here’s a quick guide to customizing your invoices:
- Click on Accounts and Settings.
- Click on Sales, and then click on the Customer Look and Feel option at the top.
- Click on New Style, then choose Invoice from the drop-down list.
- Choose the areas you wish to customize. You can choose the invoice template you wish to use, or add your company logo and some color to your invoice. You can even change the font.
- Other options include Content, Emails, and Payments, where you can specify your preferences for each.
Tips for using the invoice customization feature in QuickBooks Online:
- Be creative: Yes, it’s optional, but why not make your invoice stand out by adding your company’s logo or color scheme?
- Set up online payment options: Customers pay faster if payment is easier. Be sure to add a bank transfer (ACH) or credit card payment option to your invoice.
- Don’t stress about your choices: Remember, you can always change your invoice format or add other payment options at any time.
5. How to create an invoice
For small business owners, easy invoice creation and management is important. But what if you have no idea how to write an invoice?
No worries, since invoice creation in QuickBooks Online is a simple process, where you can easily enter a customer, product, or service on the fly, add an online payment option, and email the invoice to your customer all from one entry screen.
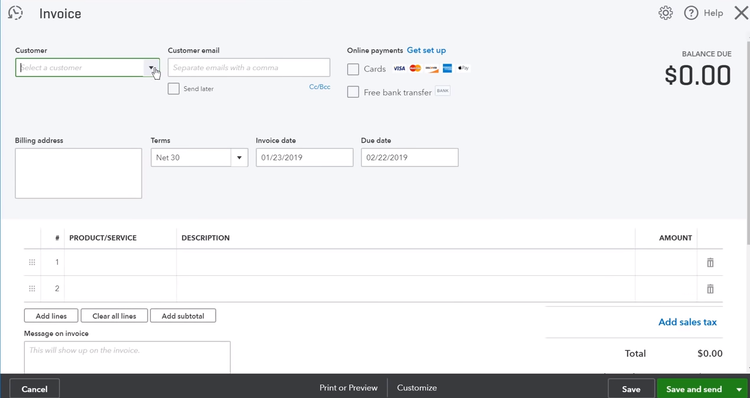
The Invoice feature in QuickBooks Online lets you quickly create an invoice for a customer. Image source: Author
Follow these easy steps for invoicing:
- Click New on the menu bar, then Invoice.
- Select a customer from your customer list. If you haven’t set up any customers or products, you can add them during the invoice creation process.
- Complete the information requested on the screen. If you haven’t entered a product or service yet, you can do so at this point.
- Check one of the online payment options if you wish to allow your customers to pay using a credit card or ACH bank transfer.
- Add a message for your customer on the invoice.
- Click on the Save and Send option to save the newly created invoice in QuickBooks Online and also email it to your customer.
Tips for using the invoice feature in QuickBooks Online:
- Use the Attachments feature: The Attachments feature lets you add a document to any invoice.
- Use the Make Recurring option: Do you have customers you bill each month? If so, you can set an invoice as recurring, eliminating the need to enter it manually each month.
6. How to track expenses
Along with producing quality invoices for your customers, you’ll also want to properly manage your expenses, whether it’s to create an expense report or to simply better track your business expenses. The Expense feature in QuickBooks lets you do just that.
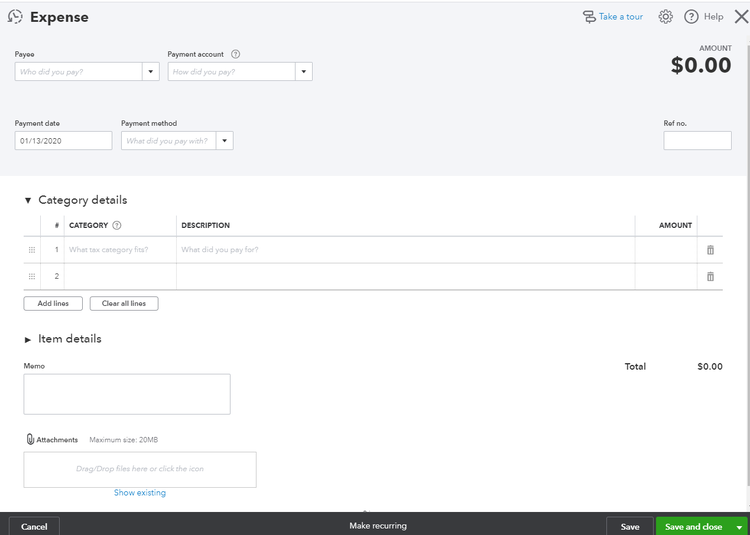
The Expense feature offers easy expense management capability. Image source: Author
Follow these easy steps to enter expenses in QuickBooks Online:
- Access the Expense feature from the navigation bar.
- Click Add an Expense.
- Choose from your list of vendors, or add a new vendor.
- Enter the appropriate payment account, adding a new account if necessary.
- Enter the category to which the expense belongs.
Entering expenses is important for creating a business budget or expense report.
Tips for using the expense feature in QuickBooks Online:
- Enter your expenses as they occur: Entering your expenses as they occur will ensure that no expenses fall between the cracks. It will also eliminate the amount of data you need to enter to classify expenses properly.
- Attach a receipt to your expense entry: This is a great way to have a back-up handy should you ever need it.
7. How to pay bills
Perhaps you’ve just received your electric bill, but it’s not due until the end of the month. If you want to enter the bill to be paid when it’s due, you’ll want to use QuickBooks Online’s accounts payable feature, which you can access by clicking on the Bill feature in the application.
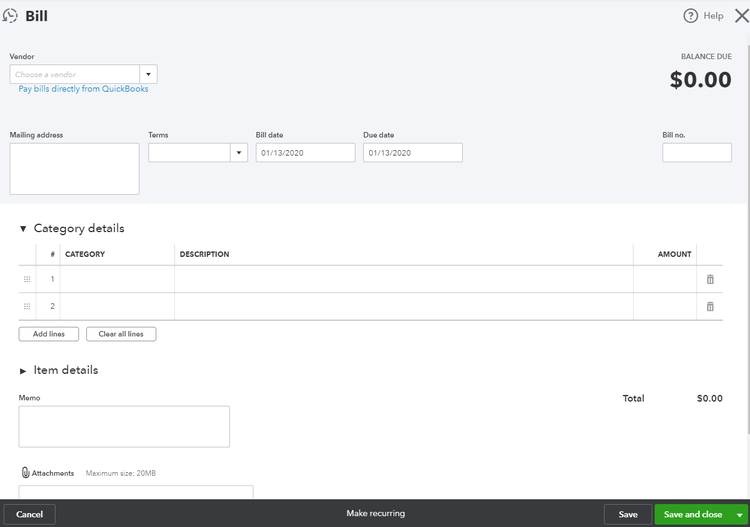
The Bill feature in QuickBooks Online lets you manage your bills for future payment. Image source: Author
Again, you can add your vendor details when entering a bill. Here are the steps for entering a bill in QuickBooks Online:
- Access the Bill feature.
- Select the appropriate vendor, or add new vendor information.
- Enter bill payment terms such as Net 10, Net 30, or whatever the vendor has provided.
- Enter the bill date and the due date.
- Enter the expense category to which the bill should be posted.
- When finished, click on Save and Close at the bottom of the screen.
When the bill becomes due, you can choose from a variety of payment options available in QuickBooks Online, including an option to pay electronically directly from the application.
Tips for using the expense feature in QuickBooks Online:
- Check due dates for accuracy: To avoid late payments and possible late fees, check the bill’s due date to ensure it’s entered and paid in a timely fashion.
- Consider using electronic payments: Paying vendors electronically is fast and easy, and it eliminates the need to write and mail a check.
Why not get started today?
Becoming comfortable with these common QuickBooks Online features will allow you to get started invoicing and managing your expenses quickly, while also ensuring that your income and expenses are being tracked and managed properly.
If you do get stuck, QuickBooks Online help is easily accessible from within the application, or you can check out the various QuickBooks Online training options offered by Intuit.
Our Small Business Expert
Mary Girsch-Bock studied accounting and business at UIC. After working as an accountant for many years in various industries, including healthcare and property management, she returned to her first love, writing. She specialized in accounting and business articles, with an emphasis on software reviews, which she wrote for more than 20 years. She continues to write for the first publication she ever wrote for, CPA Practice Advisor, while blogging for several software companies.
Share This Page
We're firm believers in the Golden Rule, which is why editorial opinions are ours alone and have not been previously reviewed, approved, or endorsed by included advertisers. The Ascent does not cover all offers on the market. Editorial content from The Ascent is separate from The Motley Fool editorial content and is created by a different analyst team.
The Motley Fool has a disclosure policy.