A Guide to Creating Seamless Transitions with Adobe Premiere Pro
With the rise of endless video content in the social media and web spaces, it’s more important than ever to be proficient in creating visually appealing videos. A well-crafted video can draw in consumers, differentiate you from the competition, and land that sale or follower.
The good news is you don’t need to hire an expensive production company -- you have the resources to create these videos on your own! One way to up the quality of your video content is to mix in seamless transitions.
Below, we give a quick overview of seamless transitions and how to quickly start adding them to your content using Adobe’s Premiere Pro video editing software.
Overview: What are seamless transitions?
In most cases, one of the primary goals in video editing is to make the cuts between shots as unnoticeable as possible. Traditionally, this is known as an invisible cut. One way to achieve the aesthetic of an invisible cut is with seamless transitions.
The term “seamless transitions” does not refer to a single example of a transition, but more a style of transitions that will naturally blend clips together and keep your video flowing. Some types of transitions that can be seamless include whip, scratch, pan, zoom, shake, and more.
When creating videos, transitions shouldn’t be an afterthought. Ideally, they are storyboarded out in pre-production and then filmed during production to get the best result. An often-referenced example is a scene from Alfred Hitchcock’s 1948 film Rope.
The camera zooms into the back of a character's coat until the frame is nearly blacked out, and when the camera zooms back out, the character has moved forward a step. The sequence is two completely separate shots but they feel like a single fluid shot.
But, if you’re throwing together a social media video for an e-commerce product, you’re probably using stock footage or footage you weren’t able to plan and shoot yourself. Don’t worry, you can still craft smooth transitions to achieve invisible cuts. In the end, not all cuts can be unnoticeable; in fact, the vast majority aren't. But the goal is to make the video flow so the cuts add style or emotion and aren't distracting.
4 benefits of having seamless transitions in your videos
We lightly touched on the perks of using seamless video transitions above, but now let’s take a deeper look. The benefits are not always obvious, but good transitions will improve your videos in more than one way.
1. Keep the video moving without distracting
As an editor, you want the video to progress without distractions, especially with interviews, documentaries, and narratives. Viewers can be thrown off by a hard cut with no transition, as well as a cut with a poorly done transition.
A successful transition should be seamless enough to keep the viewer engaged and following the story. Of course, not all your cuts will be invisible or perfectly blended. But they should be able to keep the video flowing without hiccups.
2. Improved pacing
An often overlooked video editing tip is pacing. Pacing, or timing, creates a natural flow to the video and can often be perfected with seamless transitions. If you ever notice that one video can look so much cleaner than another, but you’re not exactly sure why, it’s usually timing or pacing.
Pacing refers to the duration of a clip and the timing of cuts to control the emotional response to the segment. Similar to composing music, timing/pacing in video editing is crucial to the feel and style of the product. A seamless transition between two concisely cut clips acts as an exclamation point of sorts to drive home the feel of the scene or segment. Poorly timed edits create a choppy and uncomfortable viewing experience.
For example, If you’re editing a multicam interview, a correctly timed cut can emphasize a quote and sail you right into your next shot without issue. Once you add a neat transition, the changes between shots will feel natural and improve the quality of your videos.
3. Create catchy videos for social media
It’s likely you’re reading about video editing tips online so you can create something snazzy for social media. Swift and nifty social media videos are popular and productive for promoting products and a business. Seamless transitions will set your videos apart from the competition.
Incorporating the right type of transitions in the right spots of a 15-second social media teaser will be far more appealing than a sequence of shots with standard hard cuts. The most popular social media transitions I’ve seen lately are whip, stretch, zoom, and glitch transitions. With so much content out there, and a short consumer attention span, these types of transitions create constant movement and flow to draw in a viewer.
4. It just looks better
This one may be obvious, but a few advanced transitions will give your videos a more professional, polished look and make it look like you know what you’re doing.
But this comes with a warning: Don’t overdo it. Consumers can tell when an editor has just bought a pack of transitions online and dropped them between every cut. Transitions should be used sparingly and when fitting -- adding every cool and stylish transition you can find can turn your video tacky.
How to perfect seamless transitions in your video content
Let’s go through an example to visually show how to add and edit Adobe Premiere transitions to make them seamless. This is a simple warp transition and will display the practical use of the aforementioned benefits. (Note: This transition usually has a couple more steps to cover the black you see around the edges during the transition, but let’s keep it simple.)

A warp transition made in Premiere Pro that demonstrates how to make a seamless transition. Image source: Author
1. Shot selection
It's preferable to find two clips with similar characteristics or themes. For example, the above transition shows two clips with comparable symmetry and leading lines (the horizon, the rows of lavender, the edges of the road, etc.)
As mentioned, shots and transitions should be planned out before production to achieve the best results, but a lot of editors use stock footage or work with footage provided by clients. In those cases, find clips with similar movement, point-of-view, characters, and setting.
2. Pacing and duration of clips and transitions
Trimming clips to an ideal duration creates rhythm, and you can then choose a transition point based on that timing. The above example was cut to follow the flow of the movement in the shots and to coincide with a certain timing. Not only was the clip duration cut to fit the pacing, but the transition length, and therefore speed, was also trimmed to fit the pacing.
3. Add adjustment layers
Some transitions, such as cross dissolves and push transitions, can be dragged and dropped right onto clips in the timeline. But more advanced and fine-tuned transitions will work on adjustment layers.
In the screenshot below, you’ll see I used an adjustment layer placed on video layer 2 (V2) for this transition. If you’re new to adjustment layers, they can be added from the Project Panel or Assembly workspace. Once you drop the adjustment layer onto your timeline, you can add effects to the layer and tweak them in the Effects Control panel.
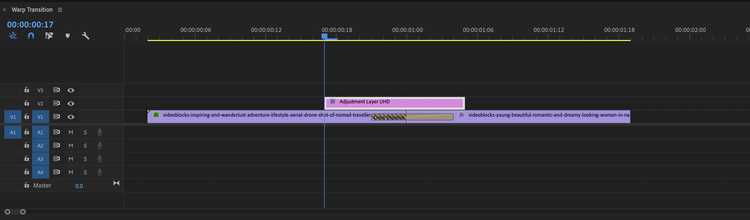
An adjustment layer placed on top of your video clips allows for more advanced and fine-tuned transitions. Image source: Author
4. Tailor values with keyframes
If you’re new to keyframing, it can be a complicated subject, so I suggest you take a deeper dive on that topic when you get the chance. Briefly, keyframes are dropped and adjusted in the Effects Control panel and essentially control the effect, and in turn, your transition. To create a truly seamless transition, you can’t just drag and drop a preset transition -- you need to adjust the keyframes to make the transition pristine.
In the above screenshot, you’ll see the effects Directional Blur and Lens distortion were added from the Effects panel. Within the Effects Control panel, there are nodes indicating values for the two mentioned effects. Changing the value of any sub-effect will add another node, or keyframe. Add, delete, move, and adjust keyframes until the transition looks just the way you want it.
Both Adobe Premiere transitions and After Effects transitions rely on keyframes, so it’s an important skill to master.
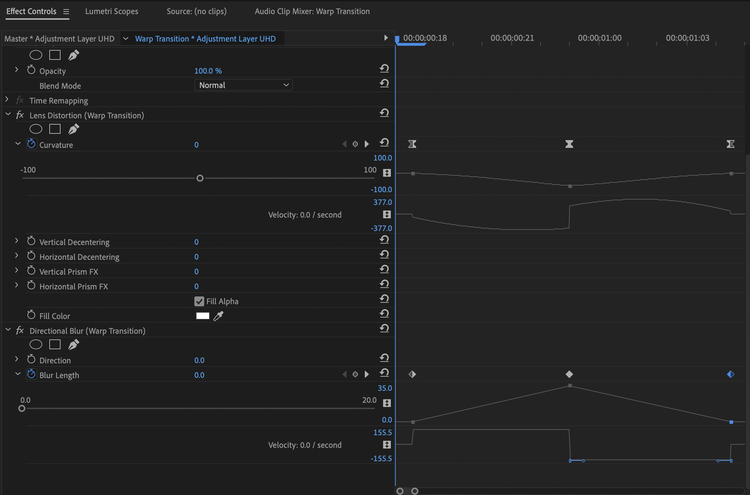
An example of keyframes for the Directional Blur and Lens Distortion effects in Premiere’s Effects Control section. Image source: Author
Source: Premiere Pro software.
Moving forward with your transitions
Now that you’ve got the rundown on how to edit videos with seamless transitions, you can start working them into your content. When picking and choosing which transitions to use and where, keep in mind the benefits and ideas mentioned above.
Most importantly, don’t get frustrated if certain transitions are difficult to replicate and aren't coming out as spotlessly as you’d like. The more you work with adjustment layers, timing, and keyframes, the closer you’ll get to perfecting a seamless transition. Soon enough, viewers will think the video content on your website was professionally done.
Alert: our top-rated cash back card now has 0% intro APR until 2025
This credit card is not just good – it’s so exceptional that our experts use it personally. It features a lengthy 0% intro APR period, a cash back rate of up to 5%, and all somehow for no annual fee! Click here to read our full review for free and apply in just 2 minutes.
Our Research Expert
Matt Kilefner writes about video editing software for The Ascent and The Motley Fool.
We're firm believers in the Golden Rule, which is why editorial opinions are ours alone and have not been previously reviewed, approved, or endorsed by included advertisers. The Ascent does not cover all offers on the market. Editorial content from The Ascent is separate from The Motley Fool editorial content and is created by a different analyst team.
Related Articles
View All ArticlesBy: Ben Gran | Published on Jan. 26, 2024
By: Steven Porrello | Published on Feb. 28, 2024
By: Ben Gran | Published on Feb. 27, 2024
By: Maurie Backman | Published on Feb. 27, 2024
By: Chris Neiger | Published on March 2, 2024