Updated
Invoicing is one of FreshBooks’ best features. We explain the process step by step and show you how easy it is to create an invoice for your business.
As a small business owner, you know that your customers aren’t going to pay you until you send them an invoice. Luckily, if you’re using accounting software, creating an invoice is a fairly easy process, particularly if you’re using FreshBooks’ cloud software that makes accounting and invoicing an easy task for your small business.
Don’t worry if you’re still learning your way around FreshBooks. We’ll point out some of the best invoicing features found in FreshBooks and give you a step-by-step guide to creating your first invoice.
5 important invoicing features FreshBooks offers
Unlike some FreshBooks alternatives on the market today, FreshBooks is not just an invoice generator but a complete accounting application. In addition to creating professional-looking invoices, FreshBooks offers a ton of really cool features that make the invoice creation process even easier.
1. Invoice templates
FreshBooks only offers two invoice templates, Simple or Modern, but any invoice that you customize can be saved in FreshBooks as a template. This makes it easy to create the invoice style you want without having to recreate it each time you invoice a customer.
2. Professional-looking invoices
FreshBooks invoices are professional in appearance and include all of the standard information that invoices should display, including the following.
- Company logo
- Date of issue
- Due date
- Invoice number
- Reference field
- Add taxes line
- Terms
- Optional notes field
There are also options for adding a discount or requesting a deposit.
3. Late payment reminders
Although this is optional, there’s no reason not to take advantage of the Late Payment Reminders feature in FreshBooks. The reminders feature sends your late-paying customers up to three reminders at the intervals you choose, with the option to add a personal message to each reminder.
4. Recurring invoices
If you bill the same amount monthly, quarterly, or even annually, you can choose to make any invoice recurring. There is also an option to save your customer’s credit card information (with their authorization) to have the invoice paid automatically.
5. Charge late fees
Again, this is optional, but there’s no good reason not to use this feature, which will automatically add either a flat fee or percentage late fee to any past-due invoice. For example, you can choose to add a late fee once your customer’s bill is five days past due.
How to create an invoice in FreshBooks for your business
If you’re looking for easy invoicing software, FreshBooks has you covered. Invoices can be created in minutes and are professional in appearance, and there are a variety of useful options available. For those looking for mobile invoicing, the FreshBooks mobile app supports both iOS and Android devices and allows you to create an invoice from your smartphone or tablet.
If you’re ready to create professional invoices in FreshBooks, let’s get started.
Step 1: Click the New Invoice button
Once you sign into FreshBooks, you’ll have immediate access to the dashboard where you can view the status of any current invoice that has been sent.
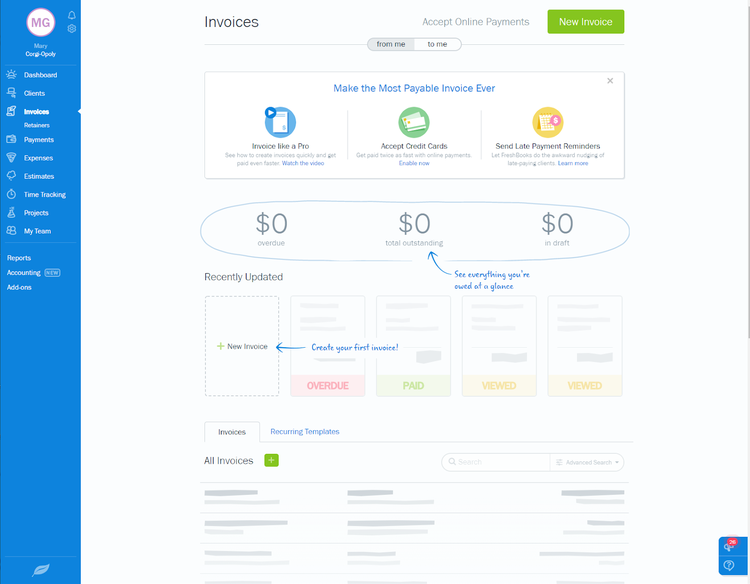
FreshBooks uses intuitive navigation from its dashboard Image source: Author
for easy access to system features. Source: FreshBooks software.
To start entering a new invoice, just click the New Invoice button. Don’t worry if you haven’t added your customer or product to FreshBooks yet. You can enter that information as you create the invoice.
Step 2: Customize your invoice
Once you’re on the invoicing screen, you can begin to create your invoice. The first thing you’ll want to do is add your business logo to the invoice. Once you do, it will be displayed on all subsequent invoices, although you can change it at any time.
You’ll also want to choose the FreshBooks invoice template you wish to use. You can choose either the Simple invoice template, which is seen below, or the Modern invoice template, which allows you to add a colored band and a larger image to the invoice. You can also choose a theme color for your invoice at this time.
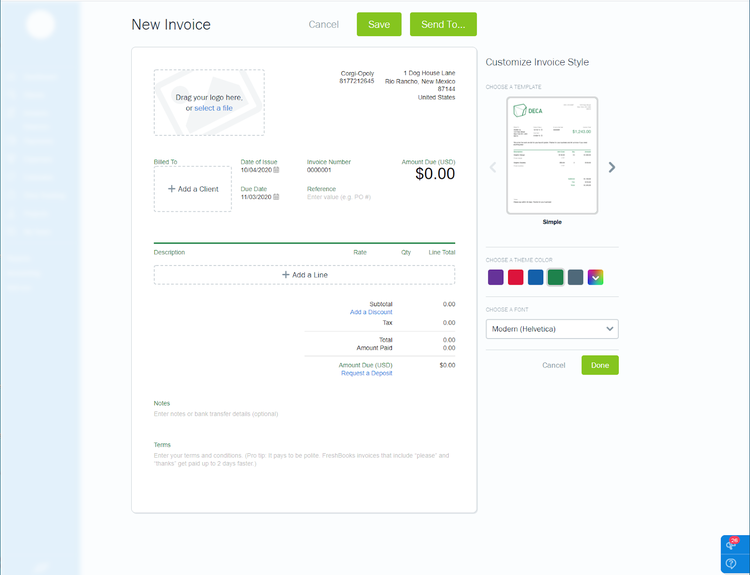
FreshBooks allows you to choose from two invoice templates, add an image, and even choose a color theme for your invoice. Image source: Author
Don’t like the default font? That can be changed as well. Once you have your invoice looking the way you want it to, you can start adding the details.
Step 3: Enter the invoice details
This is where you’ll enter the following information.

The New Invoice screen is where you can add customer, product, discount, and deposit information. Image source: Author
- Billed To: You can choose from an existing customer or add a new one in the Billed To field.
- Description: You’ll enter your product or service on this line, again choosing from an existing product or service or adding a new one. You’ll also need to add the rate or cost of the item being sold, the quantity, and your total.
- Add a Discount: Add a discount to any invoice by clicking on the Add a Discount option, which lets you enter a discount percentage.
- Request a Deposit: Finally, for larger jobs, you also have the option to request a deposit, which can be a flat amount or a percentage of the total invoice.

The Request a Deposit feature allows you to request a down payment for larger jobs. Image source: Author
Step 4: Accept online payments
FreshBooks offers an optional online payment feature that works with PayPal, FreshBooks Payments from WePay, and Stripe, with an option to accept ACH bank transfers also available. All payment information can be entered and saved in FreshBooks during product setup.

FreshBooks allows you to accept online payments from your customers. Image source: Author
If you haven’t already set up online payment options, you can do so directly from the invoicing screen.
Step 5: Make it recurring
Let’s say you just created an invoice for monthly IT services for one of your customers. FreshBooks allows you to make that invoice recurring. Even better, if your customer approves, you can save their credit card information and process their payment automatically each month, saving you a lot of time and follow-up work.
Step 6: Send it to customers
Before sending out an invoice, make sure that you’ve taken advantage of any other options available, such as adding a personalized note at the bottom.

Your invoice is ready to email to your customers, or it can be printed and mailed if desired. Image source: Author
If everything looks good, click the Send To button, and your invoice will be emailed to your customer. You can also print and mail the invoice if you wish, but if you email the invoice and include an online payment option, you’ll likely get paid quicker.
A View History option is available at the top of all invoices, giving you an invoice timeline. Once the invoice has been sent to your customer, the timeline will display a Sent status. You’ll also know if your customer has viewed the invoice because the timeline status will change from Sent to Viewed in this section.
FreshBooks can create professional invoices for your customers
If easily created and professionally designed online invoicing is important to you, look no further than FreshBooks. With FreshBooks, creating an invoice takes minutes and the process is simple enough for new users to grasp even without any prior knowledge of the application.
If you’re still processing invoices using word processing or spreadsheet applications, it’s time to make your life a little easier and start creating professional invoices the easy way by using FreshBooks.
Our Small Business Expert
Mary Girsch-Bock studied accounting and business at UIC. After working as an accountant for many years in various industries, including healthcare and property management, she returned to her first love, writing. She specialized in accounting and business articles, with an emphasis on software reviews, which she wrote for more than 20 years. She continues to write for the first publication she ever wrote for, CPA Practice Advisor, while blogging for several software companies.
Share This Page
We're firm believers in the Golden Rule, which is why editorial opinions are ours alone and have not been previously reviewed, approved, or endorsed by included advertisers. The Ascent, a Motley Fool service, does not cover all offers on the market. The Ascent has a dedicated team of editors and analysts focused on personal finance, and they follow the same set of publishing standards and editorial integrity while maintaining professional separation from the analysts and editors on other Motley Fool brands.
The Motley Fool has a disclosure policy.