Published April 22, 2024
New software can sound like a big undertaking, but creating a website on Squarespace is rather straightforward. Whether you are building a website for a church or need a website to market your business, Squarespace makes designing a website intuitive and straightforward.
We start you at square one (no pun intended), choosing the right plan, and walk you through not only publishing your content, but optimizing it for success and tracking its performance. With each step you complete, you’ll be that much closer to launching your site.
How to use Squarespace as your small business’s CMS
There’s no better place to start something new than at the beginning. When you’re looking for tips on how to build a Squarespace website, the all-important first step can often be overlooked.
That’s why we’ve ensured this guide includes all of the most essential pieces of the Squarespace site-building process, beginning with selecting the right plan for you.
Step 1: Signing up
The first step for creating a website using Squarespace is essentially a two-step process. You’ll sign up for your free trial, and then, to extend your website into something more permanent, you’ll need to pick a price plan.
Starting the process is easy enough: Click on the “get started” button, and it takes you to what we cover next, in step 2.

The “get started” button takes you right to the page to start your free trial. Image source: Author
After that, when you’re ready to make it permanent, you’ll need to commit to a price point and a plan that works for you. There are a few things you should keep in mind when signing up in earnest.
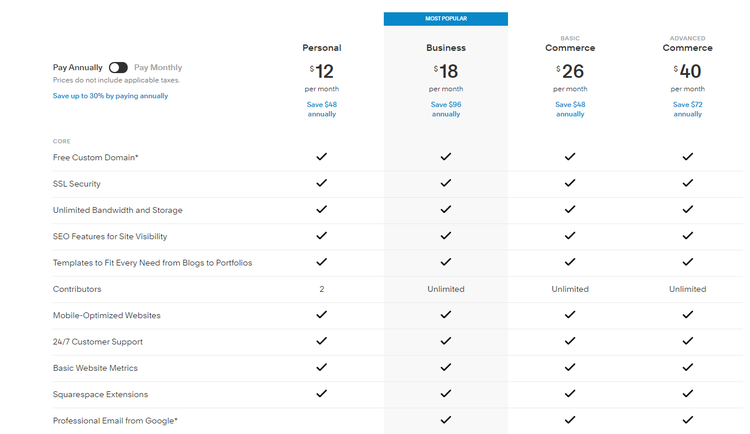
Squarespace has four tiers of plans available, with options for different needs and budgets. Image source: Author
Tips for signing up:
- Avoid overspending: If your budget allows, opt to pay an annual lump sum over monthly payments. It can save you significantly -- up to 30% overall.
- Take full advantage of the free trial: You can get a lot done in two weeks -- possibly the majority of your entire website building. Really use that time to lay the foundation so you can start strong and can go live right out of the gate when you purchase your paid plan.
Step 2: Defining your site goal
The Squarespace website builder is so popular partially because it helps you narrow in on your perfect build. Since there are thousands of themes and templates available, using Squarespace’s prompts to get specific about the goal of your site does a lot of the narrowing for you.
Squarespace takes that information into account and automatically suggests site builds that are the best fit for you so you can worry less about laying out your website correctly.

You can tell Squarespace the goal or function of your site to streamline your creative process from the beginning. Image source: Author
Tips for defining your site goal:
- Don’t be afraid to get specific: Squarespace has a wide array of site theme options, so don’t feel like you’re selling yourself short. Dig into the primary purpose of your site, and let Squarespace do the hard work.
- If you’re feeling confident, skip it: Letting Squarespace narrow down your themes isn’t mandatory. If you feel comfortable, you can skip this section and browse through Squarespace’s full library yourself -- but remember to keep your site intent in mind.
Step 3: Choosing the right template or theme
Whether you let Squarespace narrow it down for you or not, your next step is actually choosing that final site theme through templates.
Click through the options by selecting a category on the left, and browse the available site themes on the right. Once you’ve found your winner, click on "Start With X" to lock in your template and begin building.
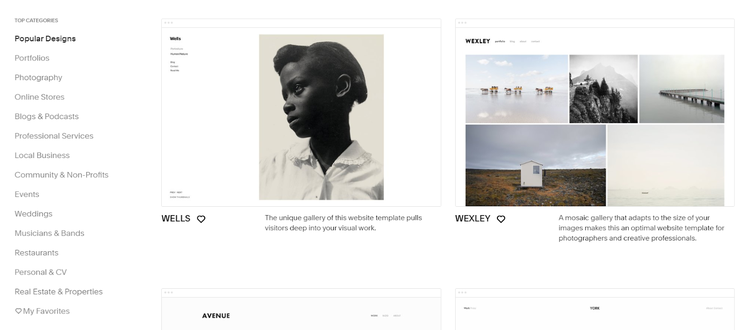
You can browse templates by popularity or site purpose categories. Image source: Author
Tips for choosing the right template or theme:
- Keep in mind your site’s purpose: Choose templates with intent. For example, if you want an artistic portfolio, opt for a more image-heavy layout; if you’re using Squarespace to build an e-commerce website, choose based on product showcase potential, etc.
- Select a few favorites at first: The handy “like” feature allows you to select and organize your top theme choices easily. Simply click the heart icon to save a theme to a list of favorites, then you can browse as needed and decide the winner from there.
Step 4: Set up a domain
When you start with Squarespace, you are auto-assigned a placeholder URL that follows the naming convention of example-site.squarespace.com. If you aren't ready to pay the price for a full, custom domain, you can alter the first part of your site name, but it will still end in ".squarespace.com."
Fortunately, Squarespace makes it easy to look professional. Set up your domain by going to the Settings option in your side toolbar; click on Domains to purchase one or bring an existing domain to Squarespace.
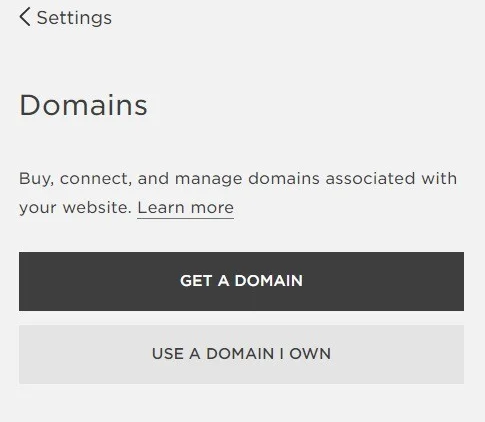
There are two simple domain options: Integrate an existing domain name, or get one through Squarespace. Image source: Author
If you’ve already purchased a domain name, click "use a domain I own" and let Squarespace import that info. If you don't have a domain, you can use Squarespace's "get a domain" feature to purchase one. All you need to do is enter the domain name you want, and Squarespace will search its availability.
Next, it will display a list of results (the same as, if available, and similar to your search) and pricing, with options ranging from free to $70. Add your desired domain name to your cart and check out.
You'll get an email to verify post-purchase, and then your Squarespace domain is registered. It will display within an hour or two in your "domains" panel.
Tips for setting up a domain:
- Learn the different domain styles: For different types of domains, there are different registration requirements. Read up on what needs to be in place for each (.ca, .uk, etc.) as there are different laws and requirements.
- Be patient: Though most domains are ready in about an hour, sometimes the process can take up to 72 hours. If your domain isn’t showing on your list, give it the full 72 hours for the registration process to resolve before you reach out to Squarespace.
Step 5: Design your site’s style
Your site's style sets the tone for your brand. Within the parameters of your working theme, you can set up style guidelines.
In the Design tab on your toolbar, select fonts, font sizes, site colors, and much more to design your site.

You can style your theme with colors from your brand guidelines to match your brand identity design. Image source: Author
Tips for designing your site’s style:
- Get your HTML color codes ready: If you already have brand guidelines (logo, brand colors, marks, etc.), you can more quickly and efficiently build your site’s style around that to ensure a complete match.
- Use Squarespace’s media options: Upload a lot of your image files right away into the handy media library, so they are ready when you need them. Alternatively, you can also take advantage of Squarespace’s partnership with Unsplash and Getty Images. Unsplash images are free to use, and Getty starts at $10, allowing you access to a vast library of licensed photos.
Step 6: Add pages
Now it's time to add the pages you need -- and skip the ones you don't. Adding pages is easy: Click the "+" icon on your Pages section in the left toolbar, and select from the options: Page, Product, Cover Page, Folder, Album, Index, Blog, Events, Gallery, or Link. Select what you need, and then you’re presented with a streamlined blank canvas.
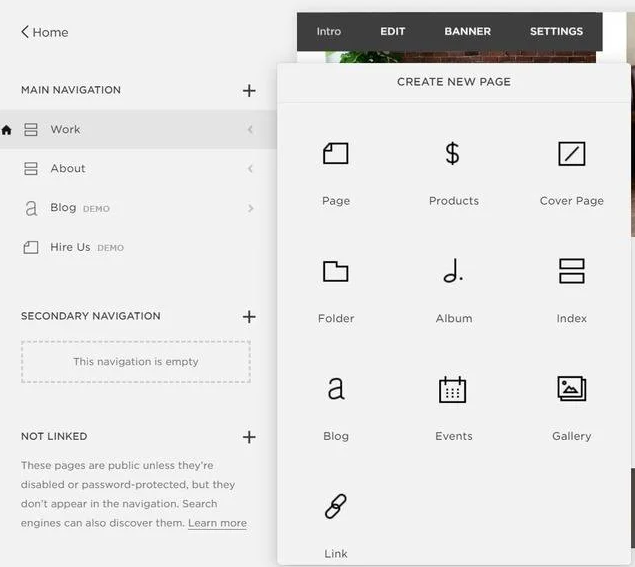
The options for page creation are precise and easy to understand. Image source: Author
Tips for adding pages:
- Create a cover page: Before you start making your site, use the cover page provided by Squarespace to set up a "coming soon" page. Include on this page brief content and social media links (or a newsletter sign-up) to let visitors know what to do in the meantime, while you’re building your site.
- Set up your main pages first: You may have 50 cool ideas for galleries or deep-dives, but build out all of your main pages first (Home, About, Blog, Shop, etc.), so you can embed and offshoot more easily later.
Step 7: Edit pages
Once you add your main pages, it’s time to edit! The blank canvas of your new page lays it all out for you.
First, you can add a title; then, you can write content, upload media, and establish visibility settings.
Editing pages in Squarespace is a guided, block-by-block process. Image source: Author
Tips for editing pages:
- Publishing isn’t all at once: Keep in mind that there is no “publish all” option for Squarespace, so as you save and publish page by page, each one goes live or updates at that moment.
- You can switch up the order: Simply drag around the page names in the toolbar to reorder your pages if you don't like the flow.
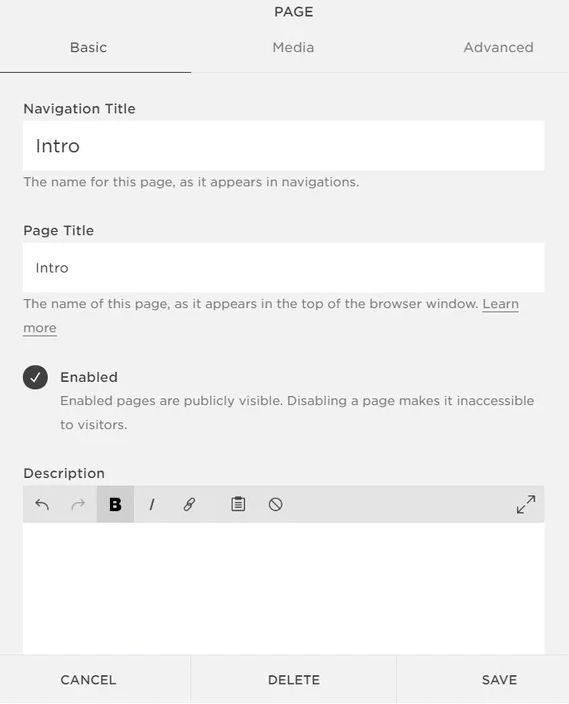
Step 8: Setting up SEO
One of the most important features you can add for content management is SEO and keyword ranking. You need your site to be seen by search engines, so you need help with algorithms.
The marketing section of your toolbar has an SEO option where you can import your keyword checklist and link it to Google for rankings.
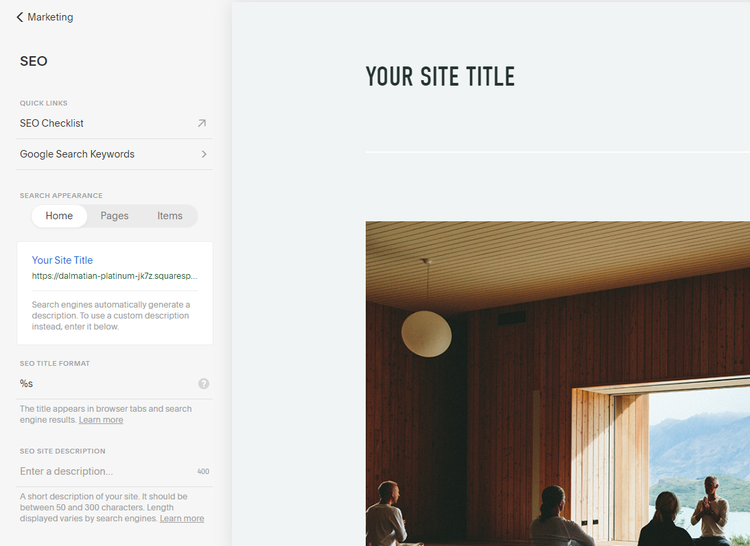
Squarespace’s SEO options guide you through each step. Image source: Author
Tips for setting up SEO:
- Use your keywords list: Starting right off the bat with thought-out keywords means Squarespace can help optimize your site appropriately from day one.
- Pay attention to character count: Make sure your titles and tags are in the sweet spot: not too short, but not so long so as to be cut off by search engines.
Step 9: Using analytics
Lastly, you should set yourself up for success with analytics. Google Analytics integrates right into Squarespace via the Analytics button on your dashboard's home.
In the home menu, go to Settings, then Advanced, then External API Keys, and in the Google Analytics Account Number box, enter your site's tracking ID.
By linking your Google Analytics account for your domain through Squarespace, you can track traffic trends, keywords used, and much more.
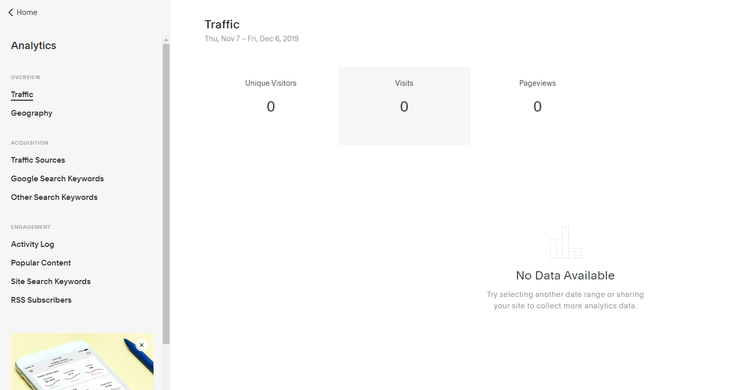
Google Analytics is at your fingertips right on the Squarespace backend. Image source: Author
Tips for using analytics:
- Be patient: Depending on the size of your site and audience, it can take up to 24 hours for analytics data to populate.
- Hide your own activity: Don’t falsely inflate your data by accident. Hide your IP address from being tracked as a visitor, since each time you preview your own pages, Google will erroneously count that as organic traffic.
Your Squarespace site is ready
What once seemed overwhelming is quite manageable once you break it down into steps. Its easy setup and site management is what makes Squarespace one of the best CMS software solutions.
From choosing your pricing plan to clicking the publish button (and tracking your site’s data), you can master Squarespace in no time.
Our Small Business Expert
Rose Wheeler is a seasoned writer and content manager with more than 15 years of experience. She specializes in content related to digital marketing, small business, personal finance, and CMS. Her work has appeared on sites such as Selz, The Cheat Sheet, and Swaay. When she's not working with her awesome clients, Rose enjoys cooking, playing games and curling up with a good book.
Share This Page
We're firm believers in the Golden Rule, which is why editorial opinions are ours alone and have not been previously reviewed, approved, or endorsed by included advertisers. The Ascent, a Motley Fool service, does not cover all offers on the market. The Ascent has a dedicated team of editors and analysts focused on personal finance, and they follow the same set of publishing standards and editorial integrity while maintaining professional separation from the analysts and editors on other Motley Fool brands.
The Motley Fool has a disclosure policy.