7 Tips to Edit Videos Like a Pro
With free online editors and reasonably priced professional software available, video editing is more accessible than ever. Users are creating their own personal content, business promotions, videographer website videos, documentaries, and more.
But sometimes you may run out of ideas or feel stuck when you’ve been editing for a while. Below, I cover seven different topics that will not only improve your editing skills but will also give you ideas and topics to delve into further.
The 7 best tips to edit videos like a pro:
- Edit values with keyframes
- Layer elements to create composites
- Composite with green screen
- Design sound with audio tools
- Use B-roll
- Shoot in 4K
- Choose the right computer specifications
1. Edit values with keyframes
Simply put, keyframes change the value of parameters, and they are super important when it comes to creating effects, compositing, and tracking. Keyframes are consistent across DaVinci Resolve, Premiere, Final Cut, and Avid, so they’re useful in whichever video editing app you use.
Keyframes work by changing values across time. So, for a simple push transition, the position value would be changed over one second to move the video off of the screen. Keyframes can be used to animate position, rotation, scale, and on and on.
When applying effects to footage, keyframes will also be used to animate the included parameters of the effect. If you’re applying a lens distortion, you can adjust the amount of distortion over time with keyframes. Below is an example of keyframes working to animate a lens distortion effect. You can see the playhead scroll through the effect keyframes in the upper left panel.
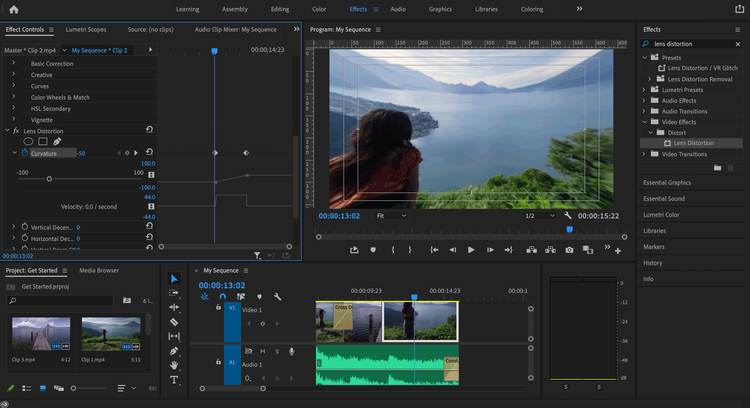
Using keyframes in the effects control panel to adjust the lens distortion effect. Image source: Author
Adobe Premiere Pro software.
In terms of audio, keyframes are used to adjust volume, panning, pitch, and more over time. As you can see, keyframes apply to almost every aspect of video editing.
2. Layer elements to create composites
Compositing is an awesome way to improve your videos and become a more talented editor. Compositing is the process of stacking multiple graphic elements on top of one another, such as texts, graphics, and videos.
The most basic examples of compositing are split-screen video or title text over a video. With a split-screen video, two separate videos are layered on top of one another and then moved to be side-by-side. Title sequences are also composites because the title text is layered on top of the video playing underneath.
More advanced compositing uses mattes or masks. With a matte, or mask, you can select a region of the top video layer that you want to be transparent, so the bottom video layer will be visible. Mattes are fantastic because you can adjust the opacity and feather of the selection to get creative. You’ll notice compositing is popular with product and merchandising videos on social media channels.
3. Composite with green screen
The ability to work with green screen footage is a common ask from clients and a useful editing skill overall. Green screen works by removing all the pixels of a color range and essentially making them transparent so the below video layer is visible. In other words, it's another form of compositing! If you ever see a computer, phone, or TV screen in a commercial or movie, green screen was used to place the image there.
The green screen look is achieved by using the chroma key, or Ultra Key, effect in your video editing software. The chroma key effect will let you select the color you want to target and allow you to fine-tune your selection with further settings. Adjust these settings until you have a clean mask and the bottom video layer shows through clearly. Although it is called green screen, it’s common to see blue screen footage, as well.
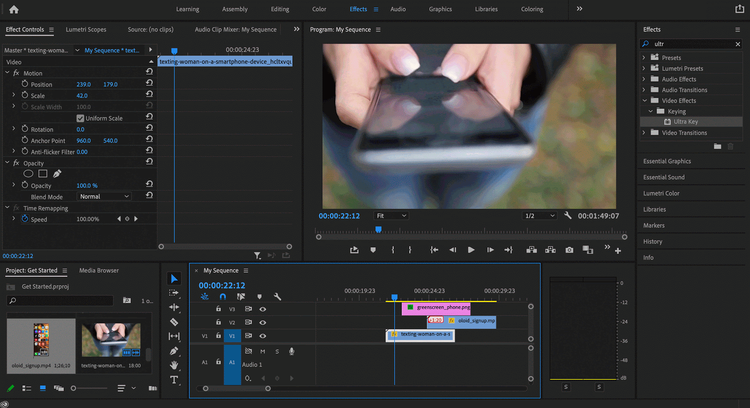
The Ultra Key effect being added to green screen footage and adjusted so the green is transparent. Image source: Author
Adobe Premiere Pro software.
The above example shows the sequence of adding green screen footage, keying out the green, and adding another video layer under the now-transparent green.
4. Design sound with audio tools
I’ve mentioned sound design before, and that’s because it’s so important! Sound design is the mixture of three audio elements -- music, dialogue, and sound effects -- to create a complementary audio experience. By breaking your audio into three categories, it’s easier to track what’s missing and what should be added.
Let’s take an interview, for example. You may have music to lead the viewer into the interview segments, dialogue during the interview, and sound effects coming from b-roll placed between the interviewee’s answers.
Properly balancing the audio settings and effects of these three components is where you can make the most impact. Here are some tips for achieving stronger sound design:
- Always fade music in and out to prevent choppiness. This can be done with audio transitions or keying volume.
- Duck music volume below the voice volume. Also, you can pull down the mid-frequencies of a music track in the EQ so the voice track shines through.
- Bass, treble, and reverb can all improve voice quality.
- Take the bass out of a voice or sound effect if you want it to seem far away.
- Use left and right panning to create spatial audio editing.
- Simple pitch adjustments can repurpose your SFX.
- Designate a separate audio track for each component -- SFX, music, and voice.
Not every video you edit will need each element. Some social media promotional videos won’t use a voice-over or dialogue, while a short narrative segment won’t require any music.
5. Using b-roll
During the production phase, the more b-roll that’s recorded the better. When you get to post-production, an endless selection of b-roll makes some tasks super easy.
One use of b-roll is to cover up cuts. When you’re cutting between takes of an interview, for example, dropping b-roll over top of the cuts creates a smooth video. Interviews tend to have a good number of “ums” and “uhs,” and you have to clean those up without having the video jump around.
Also, b-roll sequences are a great way to tell another story. If you’re interviewing an artist about a recent gallery showing, b-roll demonstrating the artist’s creative process from start to finish adds more depth to your story.
6. Shoot in 4K
This is more of a tip for production, but it affects post-production. Whenever you’re able, shoot in 4K as opposed to full HD, aka 1080p, even if your final export will be in full HD. This is because footage becomes much more versatile when shot in 4K.
For example, editors can use a single 4K shot and “punch-in,” or zoom in, to create an entirely new shot. This is a popular technique when shooting interviews to give the perception of two separate cameras. 4K footage also gives more freedom when cropping, reframing, or scaling.
A few years ago, shooting in all 4K would have seemed excessive due to the hefty file sizes, but 4K workflows are much easier now. Systems are much more capable of handling the larger file sizes, and you can use proxy files or offline editing if needed.
7. Choose the right computer specifications
This isn't a specific editing technique, per se, but it’s important to post-production. If your workstation is not up to par, the video editing process is going to be frustrating and take much longer than it needs to. Here are the specs that are important and some baselines:
- Memory: Random Access Memory (RAM) is the most essential specification for smooth video editing. Memory holds all the media files you’re working with in the timeline and ensures they playback smoothly. The baseline for RAM is 8GB, which is a passable amount for basic editing in short-form videos, or using small applications like online video cutter. RAM isn't too expensive anymore so don't be shy to upgrade as high as you can go. You’ll notice a significant difference in 16GB, 32GB, and 64GB.
- Storage: For storing media, it’s best to use SSDs or a RAID array. Solid-state drives (SSDs) have faster read and write speeds than traditional hard-disk drives (HDDs). Even so, it’s recommended to use different SSDs for your project files, operating system, and applications, so you can quickly read files from different sources. RAID arrays are actually just a number of HDDs connected together to achieve faster speeds.
- GPU: The graphics card comes in handy when working with heavy color grading, special effects, and 3D rendering. You really can't go wrong with either NVIDIA or AMD Radeon cards.
- CPU: Your computer’s processor works to render the effects in your timeline and export your final project. The more cores the better, but the benefits of your processor on video editing tend to level out after eight cores, so it may not be worth it to go higher.
- Monitors: Many factors go into the quality of a monitor, but let’s just start with size and color accuracy. When I first started, I was working on a 13″MacBook. It made my editing more difficult and slowed down the process. I recommend looking at cheaper 24-inch models as a starting point. Most editors prefer working with two, sometimes three monitors.
Taking a deeper dive
I hope the above tips are helpful to you on your journey to becoming an expert video editor. Each topic covered above should be explored further as you get the hang of things. The techniques of keyframing, compositing, and sound design are expansive and complicated and take time to master. If you’re just a beginner and specifically use Premiere, check out these Adobe Premiere tips to get you started!
Alert: our top-rated cash back card now has 0% intro APR until 2025
This credit card is not just good – it’s so exceptional that our experts use it personally. It features a lengthy 0% intro APR period, a cash back rate of up to 5%, and all somehow for no annual fee! Click here to read our full review for free and apply in just 2 minutes.
Our Research Expert
Matt Kilefner writes about video editing software for The Ascent and The Motley Fool.
We're firm believers in the Golden Rule, which is why editorial opinions are ours alone and have not been previously reviewed, approved, or endorsed by included advertisers. The Ascent does not cover all offers on the market. Editorial content from The Ascent is separate from The Motley Fool editorial content and is created by a different analyst team.
Related Articles
View All ArticlesBy: Ben Gran | Published on Jan. 26, 2024
By: Steven Porrello | Published on Feb. 28, 2024
By: Ben Gran | Published on Feb. 27, 2024
By: Maurie Backman | Published on Feb. 27, 2024
By: Chris Neiger | Published on March 2, 2024