Published April 22, 2024
When you’re building new processes or evaluating existing ones, a process map allows you to optimize the entire end-to-end workflow. Learn how process mapping can improve your organization.
Processes are part of our everyday life. We follow a process to pay bills online or renew a driver’s license. It’s how businesses scale their operations and ensure deadlines are met. Once you establish a business or a new team within a company, setting up processes quickly follows.
Even for established organizations with employees well versed in internal processes, you must document these workflows to confirm compliance, train new staff, and look for ways to improve. That’s why every company, new or seasoned, benefits from process mapping.
Overview: What is a process map?
A business process map is a document that visually outlines the steps required to complete a workflow in the company. It shows the end-to-end tasks within a process, their relationship to each other, when each step occurs, and where decision points exist.
The process must be diagrammed and documented in a way that achieves a shared understanding. Usually, this document takes the form of a flowchart.
A process map is developed whenever new workflows are established. Whoever decides on the implementation of a new procedure should help construct the process map. Those involved in executing the actual process should provide input in process map creation as well.
The process map is also a reference point for any subsequent revisions in the procedure.
Here is an example of a process map flow chart for an approvals workflow:

This business process map outlines a workflow for obtaining required approvals. Image source: Author
What is the purpose of process mapping?
A process map delivers several benefits to an organization. Some of the main advantages include the following.
Project management
Process flow mapping is used in project planning and execution. A process map allows its creators to visualize projects end to end and confirm all of the necessary elements of the processes are accounted for in the project. If you’re launching a new software system, process flow maps outline how the new system integrates with existing workflows.
If you’re working on compliance regulations, the process map validates that you’re following the required steps.
##promo-body-link##
Training
A process map serves as a training tool to educate team members on the steps in a new process. It also aids new employees with their onboarding as they learn the various process flows in your organization.
A process map flowchart can serve as the training document, but usually, that flowchart acts as a source for creating formal training materials.
Process improvement
Another benefit is that process maps enable a team to identify gaps and other areas for improvement by thinking through their procedures or performing internal audits. When you map a process, you can see where a new solution, such as project management software, can streamline the workflow.
A process map can also span different departments and teams, and it can even include external partners. Consequently, a process audit can find optimization opportunities that can elevate large portions of the organization simultaneously.
How to make a process map
Having deployed software products for companies of all sizes, I’ve become adept at process mapping. The components to assemble a process map reflect the concepts in project management process groups.
Here are the steps that helped me successfully map out business processes to launch a multibillion-dollar software platform in 23 countries around the world.
Step 1: Define goals
Begin by assessing the goals of the process. What outcome are you trying to achieve? Is it part of a larger project (meaning you have to plan how it fits in) or a stand-alone procedure? What is the scope (in other words, the boundaries or start and end points) of the process?
Are other teams affected by or involved in the outcome? If yes, collaboration between affected teams is essential for the process to meet its goals and benefit the organization.
As part of this step, communicate with stakeholders and teams outside of those directly affected by the process to ensure any necessary buy-in or knowledge sharing occurs.
For instance, a new accounting process for dealing with sales invoices may not require sales reps to change how they submit paperwork to the accounting department, but it can raise questions from customers, so sales reps need to be aware of the change.
Tips for defining goals:
Here are some considerations when kicking off a process mapping project.
- Assess pros and cons: If you’re implementing a new process, consider its pros and cons. Every new procedure has benefits and downsides. For example, if you’re implementing a process to improve product quality, it can reduce productivity. Decide if the benefits outweigh the disadvantages to determine if the new procedure is warranted.
- Communicate goals: Articulate the goals of the process when getting buy-in from others, even if it’s an improvement to an existing standard operating procedure. People are naturally resistant to change, but if they understand what you’re trying to achieve, their buy-in will be easier to obtain.
Step 2: Identify the process steps
Once you know the goals of the process and have delineated the scope, you can collect the necessary information to identify the steps in the process. Each step should be defined such that it’s understandable by someone who isn’t close to the process. Doing so makes it easier to communicate and train on the procedure.
The steps should include the following features.
- The order in which the various steps should occur.
- Where decision points happen along the workflow.
- The inputs, which are items that go into starting or helping the process, as well as outputs, which are items that come out of the process, such as project deliverables. For example, an accounting workflow to handle invoices would include the invoice as the input, and the output would be payment of the invoice.
- Which organizational roles and departments, as well as external partners, play a role in the process, and at what point in the workflow.
Here, it’s beneficial to involve some of the people who will execute the process to collect the necessary level of detail to define the process steps and integrate them into existing workflows.
Additional methods of researching the information required to build a process map include looking at existing documentation on the procedures you’re mapping as well as interviewing stakeholders and other constituents.
Tips for identifying the steps:
Follow these suggestions to capture the steps in a process map.
- Include metrics: Identify business metrics that define the success of the process so you’ll know if it’s achieving the intended goals. For example, if you’re implementing steps to improve product quality, establish quantifiable metrics that delineate if your quality goal is being met by the process. This data will tell you if the process requires refinement.
- Be hands-on: To properly capture and articulate a workflow for your process map, I recommend you actually perform the steps to any existing procedures affected by the process you’re mapping. This hands-on experience will allow you to better translate the research you compiled when you document the process steps.
Step 3: Document the process
Documenting the process map is about putting the steps and information gathered previously into a cohesive, easy-to-understand diagram. The best way to do this is to use a flowchart.
Note that there are specific flowchart shapes used to denote different parts of the process. Within each shape, you summarize what’s happening. The basic flowchart shapes are as follows:
- Rectangle: Represents each step in the process.
- Arrow: Connects each step in the process to show relationships and helps readers identify where to go for the next step.
- Diamond: A decision point where two or more options for the next step exist.
- Oval: Represents a starting point in the process as well as the end points.
- Parallelogram: Used to represent inputs and outputs.
In addition to the shapes in the flowchart, you may need to include swimlanes if your process spans different departments or different roles within the same team, such as when performing project integration management.
A swimlane is the term used for a feature of the diagram that visually distinguishes responsibilities for components of a business process. Swimlanes may be arranged either horizontally or vertically.
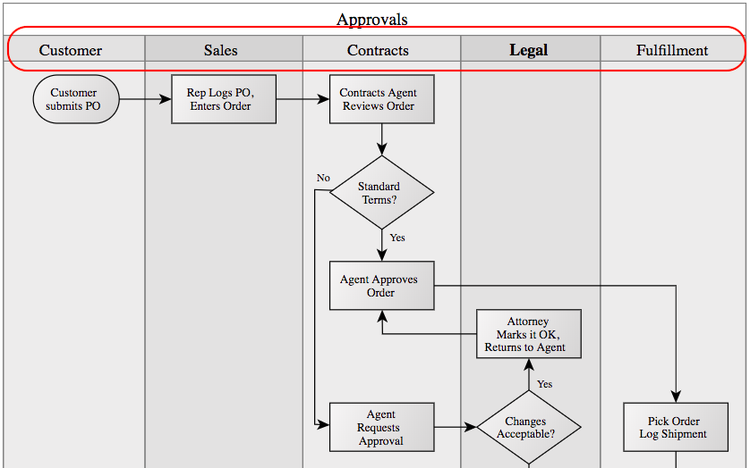
The swimlanes are the departments or team members responsible for different parts of a process. Image source: Author
In the approvals process mapping example above, swimlanes represent the different departments in an organization, such as Legal, and which steps in the process each department must complete. In this way, the process map calls out when the next step in a workflow must be handed off to another team.
Because process maps can become complex, you want to be sure the diagram is easy to follow for anyone not involved in its creation. Imagine that this document will be used for training new employees unfamiliar with the company’s internal workings; you should write the process map with this in mind.
Tips for documenting the process:
Getting a process down in a document so that it’s clear to readers can be challenging. Here are some tips to help.
- Avoid assumptions: You have to be close to a process to diagram it, but this often leads to assumptions that can muddy the clarity of the process flow. For example, the starting point in your diagram may require knowledge of another process that you don’t notate because you assumed the reader would know it. To avoid this common pitfall, document the workflow with an eye towards completeness, including references to other process maps that touch the one you’re diagraming.
- Use tools: Creating a process map flowchart can be laborious, especially as a process map becomes more complex. Process mapping tools are available to streamline this part of the work, from free software such as Google Docs and Draw.io to pricy alternatives such as Microsoft’s Visio.
Step 4: Obtain feedback and test
Once you complete the process map, collect feedback from those who will implement the process and other stakeholders as well as those who may not directly play a part in the workflow but are indirectly affected by it, such as a sales rep by a new procedure in the accounting department.
The purpose of this feedback is to ensure the process map is clear and complete.
After you’ve obtained and integrated the feedback, it’s time to test the process. The participants in the workflow should do an actual trial run to ensure the procedure works as intended. You may find that what conceptually sounded good may be too clunky or time-intensive in reality.
This is your opportunity to go back and fine-tune the process so it achieves its aims with as little downside to the organization as possible.
Tips for getting feedback and testing:
This part is key to establishing a sound foundation for your process map. Therefore, keep these suggestions in mind.
- Use metrics in testing: When running your test, apply the metrics previously defined to evaluate the success of the process. That way, you’re using time, cost, or other quantifiable data to determine if the process is achieving its objectives with minimal negative impact to the organization.
- Optimize the process: Look for bottlenecks, redundancies, or steps that can be eliminated as you obtain feedback and test the process. Is each step in the process adding value to the overall workflow? If not, remove or revise it. The more streamlined and efficient a process is, the greater the opportunity it has to add value to the organization.
Step 5: Launch and monitor
You’ve tested and revised your process map. Now it’s time to put it to the real test: rolling out the process. This includes communicating the process to stakeholders and training the team members responsible for implementing the process.
If the process involves substantial changes to existing workflows, a full change management program may be required.
If during the training process you identify areas in the process map requiring clarification or refinement, make these changes now, before the process is live. This involves going back through documenting the process, getting feedback, and testing the changes before revisiting in a subsequent training session.
Ideally, this doesn’t happen, but if it does, it’s an indicator that you need feedback from a larger group of team members than you had the first time, and to test more scenarios.
Once training is completed and the process is rolled out, your work is not done. With a live process, you may start to see situations where the process map requires additional changes. This happens because it’s not always possible to proactively account for every variable in a dynamic business.
Therefore, it’s important to monitor the process after it’s put into practice to capture these situations and improve the process.
Tips for launching and monitoring:
Here are some tips to help with this phase of process mapping.
- Focus on the goals: No process is without fault. So aim for what works, not perfection. Evaluate this by monitoring the success metrics and the number of issues arising from the process. If you’re hitting your metrics, and issues are few and far between, the process is in a good place. If you’re not achieving your target numbers, or problems crop up regularly, it’s time to figure out how the process can be improved.
- Apply a gap analysis: Even after reviewing a process that fails to meet performance metrics or causes issues for the team, it can be difficult to identify what’s wrong. In this case, execute a gap analysis. This analysis can not only uncover the root of the problem, but it can also help you discover opportunities for further optimization in the process.
A last word about process mapping
Process mapping doesn’t have to be limited to operational workflows such as implementing new software or a burndown chart in your project tracking procedures.
The same principles can be applied to many areas of a company, such as business development protocols or optimizing marketing tactics by outlining the flow of the customer’s lifecycle when interacting with your organization.
By applying process mapping across your business, you can see areas of opportunity more clearly, and it puts you on a path of continuous improvement that allows your company to achieve its goals.
Our Small Business Expert
Robert “Izzy” Izquierdo possess over 15 years of measurable success building and marketing multi-million dollar software products. Izzy is an expert in the disciplines of Software Product Management and Product Marketing, including digital solutions for Smart TVs, streaming video, ad tech, and global web and mobile platforms.
Share This Page
We're firm believers in the Golden Rule, which is why editorial opinions are ours alone and have not been previously reviewed, approved, or endorsed by included advertisers. The Ascent does not cover all offers on the market. Editorial content from The Ascent is separate from The Motley Fool editorial content and is created by a different analyst team.
The Motley Fool has a disclosure policy.