6 Useful Adobe Premiere Editing Tips
Adobe Premiere Pro is video editing software with seemingly endless tools and capabilities. To make a large program feel a bit smaller, I put together six useful Premiere Pro editing tips that I found helpful when starting out. It’s a mix of creative and practical tips designed to enhance your video editing and save you time in the process.
1. Keyboard shortcuts
If you land a video editing contract, you’re most likely going to be paid a flat project rate as opposed to an hourly rate. One way to make sure that project rate translates into a reasonable hourly rate is to be efficient, and the way to be efficient is to master shortcuts.
Below is a brief list of useful shortcuts and a brief explanation of each:
- Backward slash (\): This one is my favorite. When working in the timeline, it’s common to be scrubbing back and forth and zooming in and out, especially on longer projects. If you need to reset your view, hit the (\) key and it will zoom out to show your entire sequence with about 20% empty space at the end.
- “V” and “C”: While in the timeline, the “V” key toggles the selection tool, and “C” toggles the razor tool for cutting clips.
- Tilde (`): This key makes whatever panel you’re in into a full screen. This is useful when you’re previewing a video or you need a close look at the timeline.
- Command + D and Command + Shift + D: The first applies your default video transition to a video clip, and the second applies your default audio transition to an audio clip.
Those keyboard shortcuts are Premiere’s default settings. Under Premiere Pro in the menu, you can open Keyboard Shortcuts to switch keys in and out. When using Premiere Pro, get used to working with as many shortcuts as you can.
2. HSL Secondary in Lumetri Color
The HSL Secondary tool in the Lumetri Color panel is a fun video trick and adds creativity to your video. The tool works by targeting a specific color range using hue, saturation, and luminance. Once you select a specific color or set of colors, you can change the temperature, tint, saturation, and more.
To get started:
- Select the clip in the timeline you want to work on.
- Open the Color workspace.
- Drop down to the HSL Secondary section of the Lumetri Color Panel.
- Use the eyedropper tools to select colors in your video. Multiple colors can be added and mistakes can be subtracted from your selected color range with the different eyedropper tools.
- Expand or contract the hue (H), saturation (S), and luminance (L) levels until you find the range you want.
- Double-check your selection by selecting the Color/Gray box. This will give a clear, contrasted view of your color range selection.
- Use the color wheel and other color settings to color grade or add creative effects to your clip.
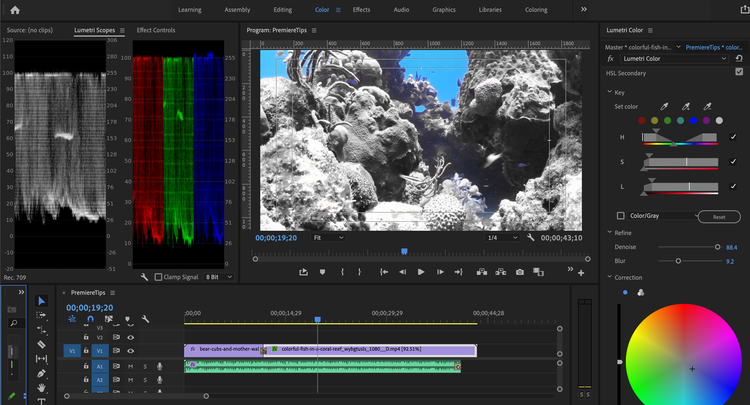
The HSL Secondary tool within Lumetri Color is used to desaturate every color except blue and create a stylistic edit. Image source: Author
The HSL Secondary tool is mostly used by colorists to color-correct and color-grade footage, but it can be a fun and creative Adobe Premiere trick. For example, you can select every color except blue in your shot and then completely desaturate them. You’re left with a mostly black-and-white shot, but the blues are completely vivid and will pop.
3. Speed ramping and time remapping
Slowing down or speeding up a clip is referred to as “speed ramping” or “time remapping.” The slow-motion and fast-forwarding effects of speed ramping are useful for transitions, for emphasizing portions of a clip, or just for adding style. There are a few ways to speed ramp, but we’ll look at the easiest way to do it:
- While in the timeline, press “R” to select the Rate Stretch tool. You can also choose it from the toolbar on the left of the timeline, but remember to use shortcuts.
- Hover over the beginning or end of a clip and extend or compress the clip.
- If you extend the clip, this translates into slow motion. If you compress the clip, this translates into fast forward. The entirety of the clip will be played in either case.
- The percentage of speed ramping will be shown on the clip after the effect is applied (e.g., 75% or 115%).
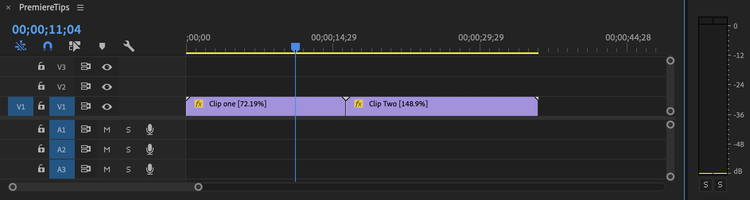
Two clips within Premiere’s timeline illustrate the speed percentage on the clip after using the Rate Stretch tool. Image source: Author
Keep in mind that if the footage you’re editing is only 24 or 30 frames per second (FPS), slow-motion effects won’t come out smoothly. Ideally, you want at least 120 FPS before you start adding slow-motion effects, but you can slow down 60 FPS footage by about 20% without any issue.
4. Adobe Dynamic Link
Motion graphics are a popular way to add depth to your videos. Although the latest Premiere Pro update allows users to craft motion graphics, most artists will design their assets in After Effects and then transport them to Premiere Pro. Adobe Dynamic Link makes this a seamless process.
Instead of having to export video files from After Effects and reimporting them into Premiere every time you make an edit, Adobe Dynamic Link shows live changes. So, if you change the positioning of text in After Effects, the change will instantly be updated in Premiere Pro.
To get started with Dynamic Link:
- Select File from the menu.
- Select Adobe Dynamic Link.
- Choose Import After Effects Composition.
- Pick the composition(s) you want to import into Premiere.
- From there, you can add your compositions to your timeline.
- DeNoise and Vocal Enhancer
Don’t forget about audio editing and sound design! A lot of focus goes into the visual portion of video production, and audio quality can fall by the wayside. But, with the DeNoise and Vocal Enhancer audio effects, you can improve (or salvage) some poor audio. The DeNoise and Vocal Enhancer effects are great Premiere Pro tools that don’t need much tweaking.
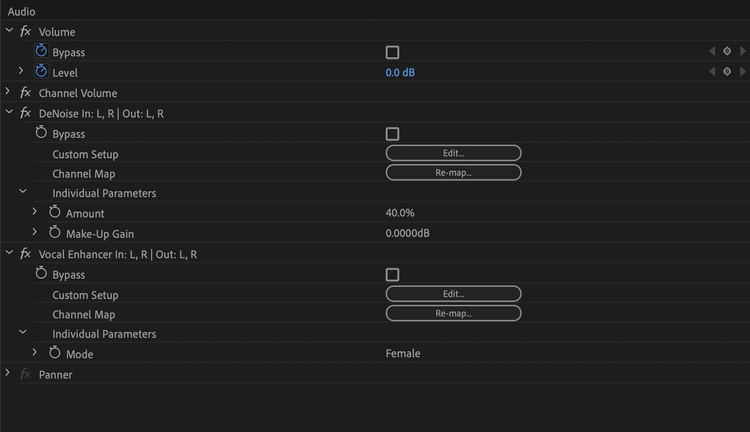
The DeNoise and Vocal Enhancer audio effects have changeable values underneath each effect. Image source: Author
The DeNoise tool is used to reduce unwanted background noise, such as talking or ambient sound. By default, it reduces indirect audio sources by 40%, which is a great starting point, and it can be increased or decreased. The DeNoise is extra useful when an interview or dialogue was recorded in a noise-polluted setting.
The Vocal Enhancer is self-explanatory -- it enhances voices. Diving into the equalization, or EQ, effect can be difficult, so the Vocal Enhancer makes minor adjustments to the frequency range to automatically improve voice quality. Users can choose from a male, female, or music setting, and they're all set.
5. Aspect ratios and frame rates
Depending on the platform where you’re publishing your content, the aspect ratio and frame rate of your video will come into play. For example, Instagram content can be formatted to a 1:1 aspect ratio, or square, while it’s best to keep Facebook content in the horizontal 16:9 aspect ratio.
Also, Instagram allows for 60 FPS, while Facebook has a max FPS of 30. So, Instagram videos are better suited to support slow-motion content than Facebook. The vast majority of video content is going to sit at 23.97 FPS or 29.97 FPS. Once the frame rate drops below 23.97, viewers can notice a visual lag.
To change the aspect ratio and frame rate of your video, head to “Sequence” and then to “Sequence Settings.” You can choose different FPS under the timebase option and change the aspect ratio by adjusting the pixels in the frame size. For reference, 1920 x 1080 pixels is 16:9 high definition.
The newest Premiere Pro update made creating for different social media settings a lot easier and is worth checking out.
Just a sample
These tips are just a small sample of the fun and useful topics to learn in Premiere Pro. They should speed up your workflow, plus the creative suggestions should add some variety and professionalism to your content. The more Adobe Premiere tips and tricks you explore, the more versatile an editor you will become and the cooler your videographer website will be!
Alert: our top-rated cash back card now has 0% intro APR until 2025
This credit card is not just good – it’s so exceptional that our experts use it personally. It features a lengthy 0% intro APR period, a cash back rate of up to 5%, and all somehow for no annual fee! Click here to read our full review for free and apply in just 2 minutes.
Our Research Expert
Matt Kilefner writes about video editing software for The Ascent and The Motley Fool.
We're firm believers in the Golden Rule, which is why editorial opinions are ours alone and have not been previously reviewed, approved, or endorsed by included advertisers. The Ascent, a Motley Fool service, does not cover all offers on the market. The Ascent has a dedicated team of editors and analysts focused on personal finance, and they follow the same set of publishing standards and editorial integrity while maintaining professional separation from the analysts and editors on other Motley Fool brands.
Related Articles
View All ArticlesBy: Ben Gran | Published on Jan. 26, 2024
By: Steven Porrello | Published on Feb. 28, 2024
By: Ben Gran | Published on Feb. 27, 2024
By: Maurie Backman | Published on Feb. 27, 2024
By: Chris Neiger | Published on March 2, 2024