5 Video Editing Tips for Beginners
Video is becoming one of the more popular social media and web assets for businesses, but it can be difficult content to create. Instead of paying an expensive third party, why not learn how to video edit yourself! Below are five, quick tips to get you started in crafting your own video content. All five topics are useful to video editing in any video editing software, but the in-depth examples are specific to Adobe’s Premiere Pro.
1. Reading scopes for color balance
Adjusting the color balance of a video can be a tough task at first, but it’s an important talent to begin practicing early. If you mostly work with stock footage, the image should be balanced already, but if you shoot your own footage, you’ll need to be able to read scopes and do the base correcting yourself.
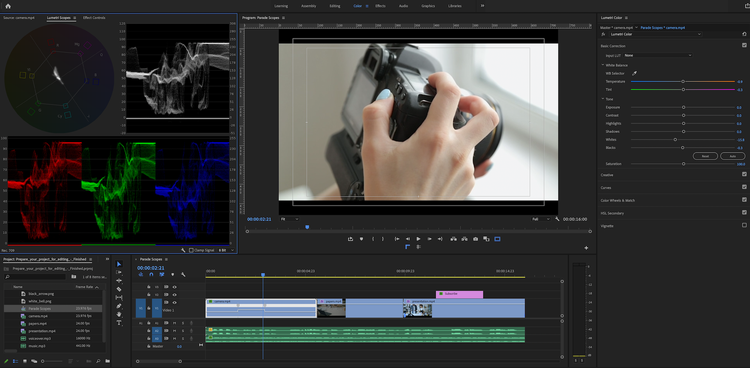
The color workspace in Premiere Pro with the Parade RGB scopes visible on the left side. Image source: Author
Use these steps to set up the Parade RGB scope for color balancing:
- Navigate to the color workspace.
- Open the Lumetri Scopes panel to view your scopes.
- Click the tiny wrench at the bottom of the panel to bring up scope types.
- Select Parade and set the Parade Type to RGB.
- You should have three different graphs in a row for red, green, and blue.
Use these steps to read the scope and start balancing your own videos:
- The left column of each graph has an IRE scale of 0-100; 0 is absolute black and 100 is absolute white.
- The graph is read from left to right and corresponds to the video from left to right.
- The goal with the Parade RGB scope is to match the top and bottom of each graph.
- If the image appears warm or orange, the red is overdone. If the picture is cool or blue, the blue can be reduced. If the video has a magenta tint, the green can be increased.
- To make adjustments, use the temperature and tint sliders in the basic correction section of the Lumetri color panel.
- Start with the temperature slider; if the red graph peaks higher than the blue, slide the temperature value left, and vice versa if the blue peaks higher.
- If the green graph is out of sync with the other two, use the tint slider to match it.
Once all three graphs match, your video will be balanced, or close to it. In general, this is just a first step in the color balancing and correction process. So once you master this first step, you’ll be on your way to learning color grading as you move forward.
2. Timeline Tools
When I first hopped into Premiere, I didn’t care to research all the tools available and learn how to edit videos. I just wanted to start making cool videos. But, a quick overview of some of the icons would have saved me a lot of time and frustration. So, here’s a breakdown of the tools -- and their shortcuts -- in the toolbar on the left of the timeline:
- Selection Tool (V): The selection tool is your default tool and is used to select and move around clips, as well as lengthen and shorten clips.
- Track Select Forward/Backward Tool (A, Shift + A): The Track Select Tool is a huge time-saver if you need to shift a huge number of clips. Instead of moving clip by clip, this tool will grab everything behind or in front of the cursor to be moved. Holding Shift will select all clips on that single layer.
- Ripple Edit (B): When shortening a clip, the Ripple Edit Tool will close the gap left after the trim, saving you a second step.
- Rolling Edit (N): Rolling Edit is another type of trim tool that will change the in and out points of two adjacent clips as you move the cut.
- Rate Stretch Tool (R): A personal favorite, the Rate Stretch Tool is used for easy time remapping -- lengthening the clip will slow the speed, and shortening the clip will increase the speed.
- Razor Tool (C): This is your cut tool; wherever the playhead is will cut the clip in two. Users can also cut clips with the shortcut Command + K.
- Slip Tool (Y): The Slip Tool will change the clip’s in or out point but does not change the duration of the clip.
- Slide Tool (U): The Slide Tool is like a combination of the Selection Tool and Ripple Edit Tool. The in point, out point, and duration of the selected clip will remain the same, but you can slide the clip along the timeline, and any gap created will be closed like a Ripple Edit.
- Pen Tool (P): The Pen Tool is all about keyframes. You can place points on the clip in the timeline for characteristics like scale, position, opacity, and time -- holding the Alt key will change to Bezier keyframes.
- Hand Tool (H): The Hand Tool is used to move around and navigate the timeline.
- Zoom Tool (Z): The Zoom Tool allows you to zoom in and out on the timeline.
- Type/Vertical Type Tool (T): This tool is not used as much since the Graphics workspace has been improved, but it’s a quick way to add text to the video.
Once you become comfortable with all these efficient tools, you’ll find yourself saving two or three steps while editing, which adds up when it comes to time.
3. Adjustment layers
If you’ve ever worked in Photoshop, you’ll be familiar with adjustment layers. Adjustment layers are used to add effects, create seamless transitions, and color correct a single clip or multiple clips. They are placed directly on the timeline and affect any video layer underneath.
As mentioned, adjustment layers can affect multiple clips, so they are useful for transitions. The adjustment layer can span the cut between two clips, so the effects can be controlled for the full transition duration.
In terms of color grading, an adjustment layer works to apply color changes across an entire sequence to keep the style consistent. Instead of bouncing from clip to clip and adding the same color changes to each one, one adjustment layer covers every clip.
To get started with adjustment layers, head to the project panel and select File → New → Adjustment layer. You can then drop one onto your timeline and begin adding effects.
4. Vignette
Adding a vignette is easy video editing for beginners, and it looks good. A vignette is a dark or light shading around the edges of the frame that draws the viewer's attention toward the center of the frame and creates a more cinematic look.
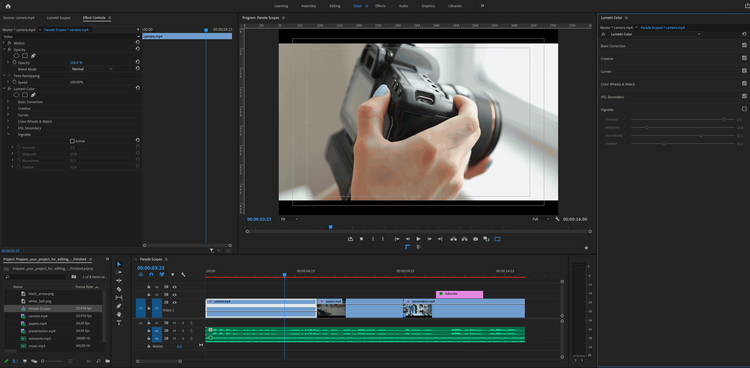
The vignette effect added from the Lumetri color panel in Premiere Pro. Image source: Author
Vignettes are best added as a last step in the creative workflow, once all editing, color, and effects are finished. To add a vignette:
- Open the color workspace.
- Find the vignette section in the Lumetri color panel.
- The Amount slider will add the vignette; a negative amount creates a dark vignette and a positive amount creates a light vignette.
- The Midpoint slider adjustments will cover less of the frame or more of the frame.
- The Roundness slider is used to make the shape of the vignette more rectangular or more circular.
- The Feather slider will soften or sharpen the edges of the vignette.
As mentioned, vignettes are ideal for drawing viewer focus and adding a polished look to a video, but they can also be used for creative effects. For example, placing a light, feathered vignette on footage can create a dreamy effect, while a dark vignette with zero feathering creates the look of a lens.
5. Nesting
Nesting is mostly used for organizing long timelines with many layers and is a great tip for video editing. Nesting will group selected clips into a single, more manageable clip on the timeline. If you want to get back in and work with the clips that you combined into a nest, you can double-click the nested clip and it will open in another sequence.
To create a nested sequence:
- Select multiple clips in the timeline.
- Right-click the selected clips and choose Nest.
- Name your nested sequence.
Occasionally, you’ll nest a sequence that you need to undo. Unfortunately, there isn’t an un-nest option, and you may have moved too far forward for undo (Command + Z) to work. In that case, simply open your nested sequence, copy all the clips within, and paste them back into your main timeline.
In other situations, nesting clips can act as a workaround. For example, the warp stabilizer effect cannot be placed on a clip with a different resolution than the sequence. So, you can nest 4K clips into a 1920x1080 sequence, and then add the warp stabilizer effect to that nest.
Next steps
The best advice for those new to video editing is to research the software you use. Jumping straight into complicated software with no guidance is incredibly frustrating and may lead you to just throw in the towel. Once you learn the boring technical stuff, you can create the fun, exciting stuff! If you’re a Creative Cloud user, check out these helpful Adobe Premiere tips.
Alert: our top-rated cash back card now has 0% intro APR until 2025
This credit card is not just good – it’s so exceptional that our experts use it personally. It features a lengthy 0% intro APR period, a cash back rate of up to 5%, and all somehow for no annual fee! Click here to read our full review for free and apply in just 2 minutes.
Our Research Expert
Matt Kilefner writes about video editing software for The Ascent and The Motley Fool.
We're firm believers in the Golden Rule, which is why editorial opinions are ours alone and have not been previously reviewed, approved, or endorsed by included advertisers. The Ascent, a Motley Fool service, does not cover all offers on the market. The Ascent has a dedicated team of editors and analysts focused on personal finance, and they follow the same set of publishing standards and editorial integrity while maintaining professional separation from the analysts and editors on other Motley Fool brands.
Related Articles
View All ArticlesBy: Ben Gran | Published on Jan. 26, 2024
By: Steven Porrello | Published on Feb. 28, 2024
By: Ben Gran | Published on Feb. 27, 2024
By: Maurie Backman | Published on Feb. 27, 2024
By: Chris Neiger | Published on March 2, 2024