8 Useful Features in Adobe Premiere Pro
If Premiere Pro is your go-to video editing software, there may be some features you’re not even aware of. Adobe is always releasing updates with useful features designed for professional editors and hobbyists alike. The more time you spend researching and learning the features Premiere has to offer, the more talented a video editor you will become.
The following eight features are functions I include in my (almost) daily video editing workflow.
1. Interpret footage
It happens occasionally: You’re given footage that wasn’t shot at the same frame rate as the requested export frame rate. If you drop a clip shot at 60 frames per second (fps) into a sequence set at 24fps, Premiere has to eliminate frames from the clip to conform to the sequence, which will lead to unnatural playback. On the other end, if you drop footage shot at 24fps into a sequence set at 30fps, the lack of six frames per second will lead to a glitchy appearance.
But, with the interpret footage tool, you can adapt footage to a matching frame rate without losing quality. Footage shot at 60fps, 50fps, 30fps, etc., can be quickly interpreted to any frame rate.
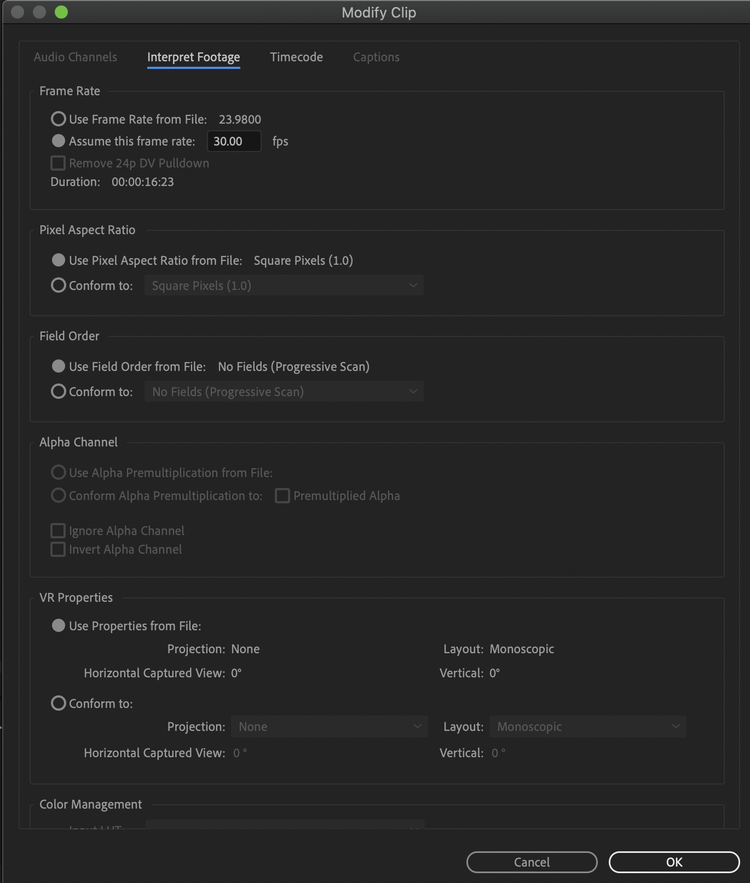
The Modify Clip window, which is used to change the frame rate of a clip in Premiere Pro. Image source: Author
It’s important to note that decreasing the frame rate will create footage that appears in slow motion and lengthen the clip duration while increasing the frame rate will speed up the footage and shorten its duration. The speed and duration can be adjusted within the sequence if that’s an issue.
2. Auto color correct
The auto color correct feature is useful if color correction isn't your forte and convenient if you need to correct and export a video quickly. To use the auto-correction tool, follow these two steps: open the color panel and click auto in the basic correction panel. All done!
Although swift and convenient, the auto tool isn’t perfect. In general, it’s used as a base point for color correction and grading, not a final step. Also, the auto function does not apply to white balance, so you’ll have to manually balance that.
3. Comparison view
Comparison view in the program monitor is your one-stop for all shot matching and referencing needs. Users can easily view the before and after of visual effects side-by-side, or readily match the color on different shots.
Comparison view has three layout options: side-by-side view, horizontal view, and vertical view. The side-by-side view shows two full frames next to each other and is ideal for shot matching when color correcting and grading. The horizontal and vertical view layout actually place two shots right on top of each other and divide them horizontally or vertically to create a single frame.
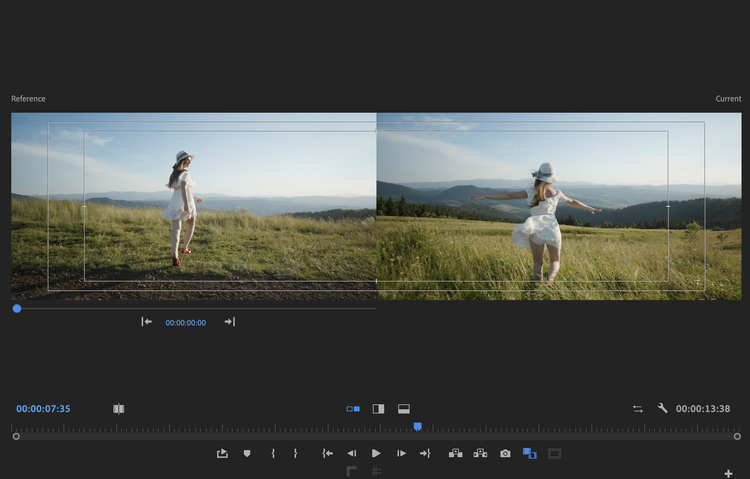
The side-by-side layout of the comparison view function in Premiere Pro. Image source: Author
The other important setting is the shot or frame comparison option. If it’s toggled off, users will be working with a current shot and a reference shot. The current shot is wherever your playhead is on the timeline, and the reference shot is another spot chosen from the sequence.
If this setting is toggled on, you will have two of the same shot. But one will be your before shot, and the other will be your after shot. So you can easily compare the before and after look of any added visual effect.
4. Safe margins and rulers
The safe margins and rulers buttons are both simple and helpful tools. These guides can be accessed by:
- Navigating to your program monitor
- Finding the add (+) icon to the bottom right of the toolbar
- Adding the safe margins (looks like two rectangles) and rulers (looks like a right-angle ruler) icons to your toolbar
- Highlighting the icons to toggle them on and off
The safe margins guide is mostly used to adhere to broadcast standards for television. Although unlikely, the outside edges of your video can become cropped depending on factors like the TV it’s being played on. Safe margins ensure that the audience has full visibility of essentials.
The safe margins tool creates two rectangles on your monitor, one to indicate the action safe region and the other to indicate the title safe area. The action safe rectangle is 10% smaller than the full frame and should contain all necessary movement. The title safe region cuts out 20% of the frame and should contain any text or graphics.
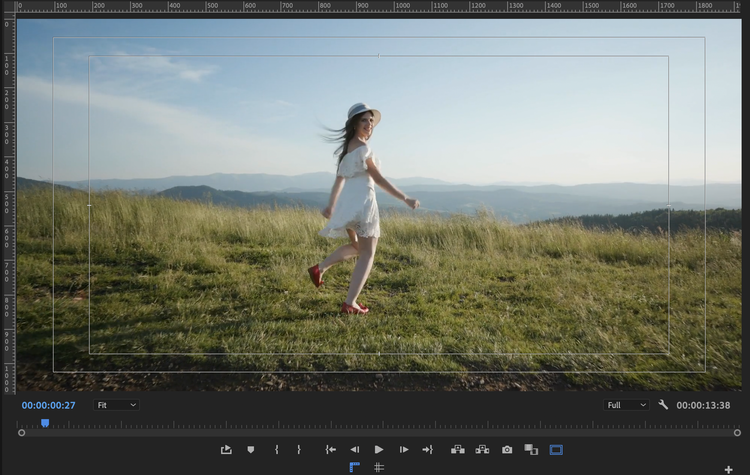
The action safe and title safe outlines on the shot frame in the program monitor. Image source: Author
The other tool, rulers, creates hash marks along the edge of the monitor to denote dimensions. It’s awesome when you want to perfectly center elements or crop videos. For example, split-screen videos should be perfectly divided at 960 pixels from the left or right on a high-definition (HD) 1920x1080 picture.
5. Create multi-camera sequence
The process of editing footage together from numerous camera sources can seem overwhelming, but Premiere’s multi-camera sequence makes this task a breeze. In moments, users can sync up multiple video and audio sources into a single sequence.
Once everything is synced, Premiere will organize the camera sources in a neat grid so you can view each feed. From there, users can scrub through the timeline and choose the clip they want to be shown by pressing the corresponding numeric key.
For example, if you shot an interview with four cameras, Premiere will create a synced sequence with all four angles and assign a number to each camera -- 1, 2, 3, 4. If you like the shot the first camera provides to start, a simple press of the 1 key will switch to that camera. If you like the angle from camera three next, pressing the 3 key will switch to that camera.
Editors used to manually sync up video and audio sources with timecodes on slates or the audio spike from the clap of a slate, so the multicam sequence function from Premiere is greatly appreciated.
6. Auto reframe
Auto reframe is one of the more popular Premiere Pro features as of late. It works by keeping the subject of your footage within the frame, no matter which aspect ratio the video or sequence is set at.
It’s especially useful when creating content for different social media and web platforms. For the most part, footage is shot in a 16:9 aspect ratio, also known as landscape. But if you’re uploading content to Instagram’s square 1:1 ratio, or Snapchat’s 9:16 ratio, you’ll need to reframe.
Instead of having to go through the entire clip frame by frame to ensure your focal point is still within frame at a different aspect ratio, auto reframe will create keyframes throughout the video to do this for you. Auto reframe comes with three different modes:
- Default: This is the best setting to start and adjust from there.
- Slower motion: This is perfect for minimal movements, so fewer keyframes are made.
- Faster motion: Ideal for action and sports footage, this creates many keyframes to track all the movement
You can auto reframe a single clip or an entire sequence if you need to repurpose a finished video for other platforms.
7. Audio assign
In a recent update, Premiere Pro included an audio feature that simplifies the audio mixing process for beginners and experienced users. The audio type and audio assign functions allow users to efficiently adjust audio with ease and are super helpful to the creative workflow.
There are four audio types users can assign to an audio track: dialogue, ambiance, SFX, and music. Once assigned with a single click, the audio panel will populate with presets and effects available to that category.
For example, if you assign the dialogue tag to an audio track in the timeline, you’ll get options such as balanced female voice, from the radio, and make close up. If you assign a music tag, you’ll get different presets and options to duck the music under other audio sources. There are also more specific settings in each category to get creative and really fine-tune your sound design.
8. Adobe Dynamic Link
Adobe Dynamic Link is a relatively new feature, and it works by connecting composites between Premiere Pro and After effects. Once linked, any composite that is created and altered in After Effects will be instantly updated in Premiere Pro -- it’s real-time editing.
This is a huge time-saver. Most motion graphics, seamless transitions, advanced compositing, and special effects are done in After Effects. Exporting elements from After Effects and importing them into Premiere every time you make an edit is not efficient, so Dynamic Link is the way to go.
To get started, find Adobe Dynamic Link in the File dropdown menu. Connecting to After Effects composites takes a few moments, so don’t get discouraged if the menu doesn't begin populating right away.
And on and on
While you piece together content in Premiere, if you ever think to yourself, “I wish Premiere Pro had a function where I could do this,” it most likely already exists. Adobe is constantly listening to user feedback and adding and updating Premiere’s functionality to fit creators’ needs.
Even after many years, I still find tiny features or settings here and there that are useful. So, keep in mind that this is only a partial list of Adobe Premiere features; there are many more to explore!
Alert: our top-rated cash back card now has 0% intro APR until 2025
This credit card is not just good – it’s so exceptional that our experts use it personally. It features a lengthy 0% intro APR period, a cash back rate of up to 5%, and all somehow for no annual fee! Click here to read our full review for free and apply in just 2 minutes.
Our Research Expert
Matt Kilefner writes about video editing software for The Ascent and The Motley Fool.
We're firm believers in the Golden Rule, which is why editorial opinions are ours alone and have not been previously reviewed, approved, or endorsed by included advertisers. The Ascent, a Motley Fool service, does not cover all offers on the market. The Ascent has a dedicated team of editors and analysts focused on personal finance, and they follow the same set of publishing standards and editorial integrity while maintaining professional separation from the analysts and editors on other Motley Fool brands.
Related Articles
View All ArticlesBy: Ben Gran | Published on Jan. 26, 2024
By: Steven Porrello | Published on Feb. 28, 2024
By: Ben Gran | Published on Feb. 27, 2024
By: Maurie Backman | Published on Feb. 27, 2024
By: Chris Neiger | Published on March 2, 2024